Making Fun Algebra Problems Funner October 29th, 2010
Patrick Stein

A month ago, a friend posted the following problem on Facebook. I just noticed it this week.
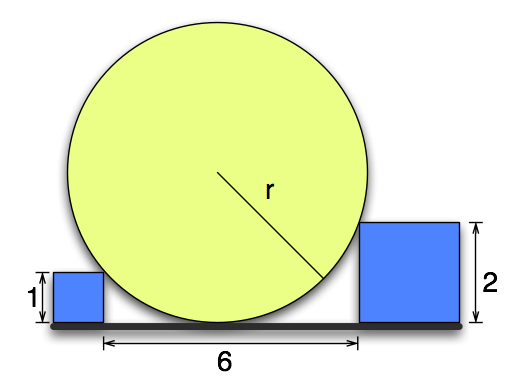
Drawing of a circle with radius r sitting on a line with two squares wedged against it.  One square has side-length 1, the other side-length 2.  There are six units between the squares.
The goal is to find the exact length of the radius r.

I love this kind of math problem.  It has a bunch of features that make it a great, toy math problem.

  • It looks like it’s going to be easy, but at the same time seems at a glance to not have enough information
  • It looks like a geometry problem but only requires that you know:
    • All radii of a circle have the same length
    • A radius to a point where a tangent line touches the circle is perpendicular to that tangent line
  • It requires only very basic algebra:
    • Pythagorean theorem
    • Solving quadratics
  • The numbers in the problem are small, non-zero integers

I spent the next 25 minutes and six pieces of paper working the problem. About 20% of the time that I spent was rechecking my work. Why did I bother rechecking my work on a toy problem?

Warning: Spoilers ahead. If you like this kind of problem, stop reading now and play with it first.

The problem with the problem

This problem failed to satisfy one of my other criterion for great, toy puzzle problems.

  • The answer is a small natural number (or the current year)

I am notorious for messing up signs when doing large algebra calculations. I had to check and recheck all of my work to make sure that I hadn’t done 5x - (3x - 2) and gotten 2x - 2 somewhere. If I had come up with an integer value for r, I’d have been done. Instead, the answer involved a half-integer plus a multiple of \sqrt{74}.

What? \sqrt{74}?!? Raise your hand if you’ve ever seen that written anywhere before this problem.

That’s what I thought.

So, I spent the next hour looking for a different set of numbers to put in for 1, 2, and 6 so that the radius r would come out to an integer. My approach was Brownian, at best. I threw Pythagorean triples at a wall until one stuck.

The sticky triple left me with [50,200,360] to put in place of [1,2,6]. So, I put the problem down for awhile.

The next time that I was in the car, I realized that the radius for the sticky triple was less than 200. That meant that the larger box was touching the upper half of the circle instead of the lower half. The circle had to overlap the box.

So, I was back to the drawing board. Of course, I’d have been back to the drawing board at some point anyway because that sticky triple violated both of my small numbers criteria.

Warning: If you want to play around with finding a set of numbers that work, do it before you read the following. There are even more spoilers ahead.

Infinitely many combinations to get an integer radius

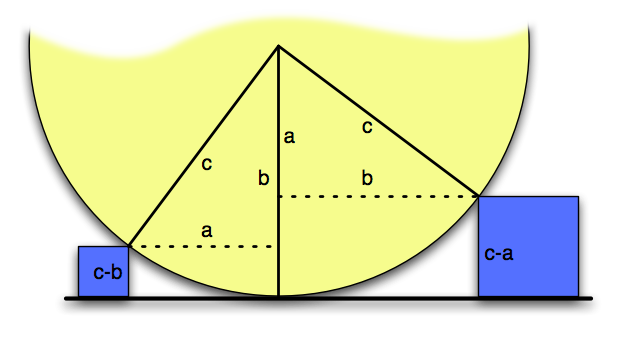
When I next sat down to play (pronounced: /OBSESS/) with this problem, I quickly hit upon the following way to take any Pythagorean triple (a, b, c) and make a version of the above puzzle where the radius r is an integer.
Same sort of diagram as above except radius is c, boxes are height c-b and c-a, and some (a,b,c) triangles are drawn in

In fact, using a 3-4-5 triangle, it is obvious that had the distance between the blocks in the original problem been 7 instead of 6, the radius would have been a small natural number.

Now. Now, I had infinitely many ways to construct this problem so that the radius was an integer. But, did I have all of the ways?

All your configuration are belong to us

When looking at that last diagram, the first question that comes to mind (for me) is: Do I really need to use the same Pythagorean triple on the left and right triangles? The answer, of course, is No.

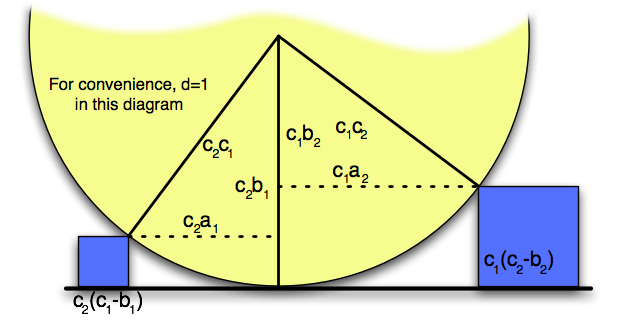
If I have two Pythagorean triples (a_1,b_1,c_1) and (a_2,b_2,c_2) and d is any (positive) divisor of both c_1 and c_2, then I can start with an a_1-b_1-c_1 triangle on the left and an a_2-b_2-c_2 triangle on the right. I can then scale up the left triangle by c_2/d and scale the right triangle up by c_1/d. Now, both triangles have the same hypotenuse.

This means that if the left block has height c_2 (c_1 - b_1)/d, the right block has height c_1(c_2 - b_2)/d, the distance between the two blocks is (c_2 a_1 + c_1 a_2)/d, and the resulting circle has radius c_1c_2/d.
A more general version of the previous diagrams

Does this cover all of the solutions? Could I possibly have non-integer a_1 and a_2 such that (c_2a_1 + c_1a_2)/d is still integer?

Well, for the problem to be formulated entirely with integers, we certainly need the hypotenuse of the right triangles to be an integer. Further, to make the blocks integer heights then both of the legs of the right triangles along the vertical radius must also be integer. So, if the triangle on the left had hypotenuse r, vertical leg b and horizontal leg a, then we know that a = \sqrt{r^2 - b^2} where both r and b are integers. Thus, a must be the square root of an integer.

It is easy to see that if a were a non-integer rational number, then its square would also be a non-integer rational number. So, either a is integer or it is the irrational square root of an integer.

So, can a be an irrational number? If a were an irrational number, then the horizontal leg of the other triangle would have to be some integer n minus the irrational a for the distance between the two blocks to be an integer. Let’s say the vertical leg of the triangle on the right is \beta. Just like b in the first triangle, \beta must be an integer. We also know that (n-a)^2 = r^2 - \beta^2. This, in turn, means that a = (\beta^2 + n^2 + a^2 - r^2) / (2n). The right hand side is clearly rational, so a could not have been irrational.

So, there you have it: all of the numbers that make this problem have all integers on the drawing and an integer answer.

Deadline approaching: in the Find the People, Lisp Programming Contest September 1st, 2010
Patrick Stein

If you haven’t started your entry for the TC Lisper’s Programming Contest, you’re not too late. The deadline is September 19th.

If you have started, post a comment here or there to let us know how it’s going!

Find the People: Lisp Programming Contest sponsored by TC Lispers July 31st, 2010
Patrick Stein

Your Lisp program will be given two input images from the same web cam. The first image will contain zero people, the second image will contain at least one person.

Your program’s goal is to find the people. You will get points for emitting the pixel coordinates of a pixel inside a person. You’ll get bonus points if it’s a head pixel. Be careful, though. You’ll lose points for emitting more than one pixel per person.

Missing Lisping June 30th, 2010
Patrick Stein

I hope that by later in the month I will have time to participate in the 2010 International Lisp Games Expo.

NeHe Tutorial 06: Textured solids June 2nd, 2010
Patrick Stein

Introduction

In the previous tutorial, we drew a rotating pyramid and a rotating cube. The next NeHe tutorial renders a textured cube rotating at different speeds around each axis.

Again, we’re going to start with our simple-tutorial base.

;;; *.lisp
#<:use "simple-tutorial.lisp">

Here is the resulting tut06.lisp.

;;; window title
"tut06: UV-textured objects"

The texture

We’re going to use a slot in our window class to store the texture. Note: it might be nice some day to break the cube out into its own class which could store its own position, rotation, and texture. For now though, we’re just going to keep piling stuff into our window class.

;;; extra slots
(texture-id :initform nil :accessor texture-id)

Loading the texture

To load the texture, I’m going to use the CL-PNG wrapper around the PNG library. So, let’s get it loaded.

;;; extra decls
(asdf:load-system :png)

Then, I’m going to need some function that reads in a PNG and creates an OpenGL texture from it. I’m going to make my function take a filename for the PNG image and an optional texture id to use for the texture. (If you don’t pass in a texture id, one is created using gl:gen-textures. The argument to gl:gen-textures tells OpenGL how many textures you want to reserve. You can call gl:gen-textures multiple times. I’m not sure what benefit, if any, you get from allocating several of them simultaneously.)

So, we’re going to open the file and decode the PNG. Then, we’re going to try to turn it into a texture. If we succeed, then we’re going to

;;; extra decls (cont.)
(defun load-png ( filename &optional (texture-id (car (gl:gen-textures 1))
                                                 texture-id-p) )
  (flet (#<:use "load-png: load-and-decode image">)
    (handler-case
        (let ((png (load-and-decode filename)))
          (assert png)          ; make sure we got the png
          #<:use "load-png: turn png into a texture">
          texture-id)           ; return the texture-id on success

        #<:use "load-png: handle errors">
        )))

To load the image, we’re going to open the file and decode it. We have to make sure to open the file for binary input.

;;; load-png: load-and-decode image
(load-and-decode (filename)
  (with-open-file (in filename
                      :element-type '(unsigned-byte 8))
    (png:decode in)))

To turn the PNG into a texture, we first have to make sure that OpenGL knows that we’re going to start tweaking this particular texture. To do that, we use bind-texture and tell it we’re working with a two-dimensional texture here. (OpenGL supports 1-, 2-, and 3-dimensional textures.)

;;; load-png: turn png into a texture
(gl:bind-texture :texture-2d texture-id)

Now, we’re going to need to hand OpenGL our texture data. The CL-PNG library keeps our data in a three-dimensional array (width, height, channels). We need to get this down to a one-dimensional array for OpenGL. Fortunately, we can take advantage of the fact that Common Lisp arrays are stored contiguously. We’ll create an array called data that is a one-dimensional view into our three-dimensional array and let OpenGL copy from it.

;;; load-png: turn png into a texture (cont.)
(let ((ww (png:image-width png))
      (hh (png:image-height png))
      (cc (png:image-channels png)))
  (let ((data (make-array (list (* ww hh cc))
                          :element-type (array-element-type png)
                          :displaced-to png)))
    #<:use "load-png: copy data to texture">
    #<:use "load-png: set up texture filters">))

To copy the data into the texture, we need to tell OpenGL how the data is laid out.

;;; load-png: copy data to texture
(let ((level-of-detail 0)
      (internal-format #<:use "load-png: determine internal-format">)
      (border 0)
      (format #<:use "load-png: determine format">)
      (data-type #<:use "load-png: determine data-type">))
  (gl:tex-image-2d :texture-2d
                   level-of-detail
                   internal-format
                   ww
                   hh
                   border
                   format
                   data-type
                   data))


The level-of-detail is used if we’re going to manually specify what this image looks like at different resolutions. For our purposes in this tutorial, we’re just going to let OpenGL handle all of the scaling for our texture so we’ll stick with the default level of detail.

The internal-format tells OpenGL what type of texture this is going to be. We’re going to use the number of bits per sample and the number image channels to figure out what format this texture should be inside OpenGL.

;;; load-png: determine internal-format
(ecase (png:image-bit-depth png)
  (8  (ecase cc
        (1 :luminance8)
        (2 :luminance8-alpha8)
        (3 :rgb8)
        (4 :rgba8)))
  (16 (ecase cc
        (1 :luminance16)
        (2 :luminance16-alpha16)
        (3 :rgb16)
        (4 :rgba16))))

The border parameter can be either zero or one. If it is zero, then the image width and height must be a power of two. If it is one, then the image width and height must be two plus a power of two. For our purposes, we’re just going to assume that the image is a power of two in width and height.

The format parameter declares what kind of data we have in our array. We’re going to use the number of image channels to come up with the right value here. With the internal format, we were able to blend both the size of the samples and the meaning of the samples into one parameter. For our input data, we give both format and data-type.

;;; load-png: determine format
(ecase cc
  (1 :luminance)
  (2 :luminance-alpha)
  (3 :rgb)
  (4 :rgba))

For the data type, we work from the number of bits per sample.

;;; load-png: determine data-type
(ecase (png:image-bit-depth png)
  (8  :unsigned-byte)
  (16 :unsigned-short))

After we have the texture data loaded, we tell OpenGL how to scale our texture when it needs it in a smaller or larger size. We are going to tell it to use linear filtering whether it needs to minimize or magnify our texture.

;;; load-png: set up texture filters
(gl:tex-parameter :texture-2d :texture-min-filter :linear)
(gl:tex-parameter :texture-2d :texture-mag-filter :linear)

That wraps up making the texture. If we ran into an error somewhere along the line of turning the png into a texture, we’re going to delete the texture if we allocated it and return nil.

;;; load-png: handle errors
(error ()
       (unless texture-id-p
         (gl:delete-textures (list texture-id)))
       nil)

Initializing our texture

To initialize our texture, we’re going to load it with the function above. Assuming that it loaded okay, we’re going to go ahead and enable texturing.

;;; display-window extra code
#<:use "display-window: make sure texture is loaded">
#<:use "display-window: enable texturing">

;;; display-window: make sure texture is loaded
(unless (texture-id win)     ; load texture if needed
  (setf (texture-id win)
        (load-png #P"./images/cube-texture.png")))

;;; display-window: enable texturing
(when (texture-id win)       ; enable texturing if we have one
  (gl:enable :texture-2d))

Rotation state

For this tutorial, our rotation state is going to consist of three angles, one for the rotation around the x-axis, one for the rotation around the y-axis, and one for the rotation around the z-axis. Each of these will initially be zero.

;;; extra decls (cont.)
(defclass rotation-state ()
  ((x-angle :initarg :x-angle :reader x-angle)
   (y-angle :initarg :y-angle :reader y-angle)
   (z-angle :initarg :z-angle :reader z-angle))
  (:default-initargs :x-angle 0.0
                     :y-angle 0.0
                     :z-angle 0.0))

We’re also going to add the rotation state into our window class.

;;; extra slots (cont.)
(rotation-state :initarg :rotation-state :accessor rotation-state)


And, make sure we initialize our rotation state.

;;; extra initargs
:rotation-state (make-instance 'rotation-state)

Preparing the tick function

Again, we’re going to try to stay near 60 frames per second. Recall that the tick interval is specified in milliseconds per tick.

;;; extra initargs (cont.)
:tick-interval (round 1000 60)  ; milliseconds per tick

We’re going to use a different rotation speed for each axis. We’ll update all three at once in the tick method.

;;; extra code
(defmethod glut:tick ((win my-window))
                                ; retrieve the current rotation
  (let* ((cur (rotation-state win))
                                ; retrieve the current angles
         (x-angle (x-angle cur))
         (y-angle (y-angle cur))
         (z-angle (z-angle cur)))

    (setf (rotation-state win)  ; replace the rotation state
          (make-instance 'rotation-state
                         :x-angle (+ x-angle 0.3)
                         :y-angle (+ y-angle 0.2)
                         :z-angle (+ z-angle 0.4))))

  (glut:post-redisplay))        ; tell GLUT to redraw

Drawing textured cubes

In the base code, we already cleared the color buffer and the depth buffer and reset the modelview matrix. Now, retrieve our rotation angles, move back into the screen, rotate through each of our angles, and draw the cube with textures.

;;; display extra code
(let* ((cur (rotation-state win))
       (x-angle (x-angle cur))
       (y-angle (y-angle cur))
       (z-angle (z-angle cur)))

  (gl:translate 0.0 0.0 -5.0)   ; move and rotate
  (gl:rotate x-angle 1.0 0.0 0.0)
  (gl:rotate y-angle 0.0 1.0 0.0)
  (gl:rotate z-angle 0.0 0.0 1.0)

  #<:use "draw textured-cube">)       ; draw the cube

Drawing the cube

To draw the cube, we first want to make sure that we have the right texture selected. Then we are going to draw each face of the cube as a textured quad.

;;; draw textured-cube
(when (texture-id win)          ; bind the texture if we have it
  (gl:bind-texture :texture-2d (texture-id win)))
(gl:with-primitives :quads
  #<:use "draw textured cube faces">)

The texured cube faces are going to be like our colored faces. Before each vertex though, instead of specifying a color, we’re going to specify the texture coordinates for that vertex. The coordinates in the texture range from 0.0 to 1.0. The point (0,0) is at the top left of the texture and the point (1,1) is at the bottom right of the texure.

This isn’t the same coordinate system mentioned in the original NeHe document. The reason for that is that he is loading a Windows Bitmap. Windows Bitmaps are stored with the image from bottom to top as you proceed through the file.

Here is the front face. Note how we are going counterclockwise in both the texture coordinates and the spatial coordinates. (Note: It is traditional to show the texture coordinates and vertex coordinates as sort of two columns of source code.)

;;; draw textured cube faces
;; front face
(gl:tex-coord 0.0 1.0) (gl:vertex -1.0 -1.0  1.0)
(gl:tex-coord 1.0 1.0) (gl:vertex  1.0 -1.0  1.0)
(gl:tex-coord 1.0 0.0) (gl:vertex  1.0  1.0  1.0)
(gl:tex-coord 0.0 0.0) (gl:vertex -1.0  1.0  1.0)

The same sort of logic continues around to the remaining five faces. I’m going to write a little function though to hopefully speed this along. Hopefully, if I use constants and an inline function, most of the calculation herein will get optimized into constants, too.

;;; extra decls (cont.)
(declaim (inline cube-face))
(defun cube-face (left up forw)
  (gl:tex-coord 0.0 1.0)        ; bottom-left
  (gl:vertex (+ (- (elt left 0)) (- (elt up 0)) (elt forw 0))
             (+ (- (elt left 1)) (- (elt up 1)) (elt forw 1))
             (+ (- (elt left 2)) (- (elt up 2)) (elt forw 2)))

  (gl:tex-coord 1.0 1.0)        ; bottom-right
  (gl:vertex (+ (+ (elt left 0)) (- (elt up 0)) (elt forw 0))
             (+ (+ (elt left 1)) (- (elt up 1)) (elt forw 1))
             (+ (+ (elt left 2)) (- (elt up 2)) (elt forw 2)))

  (gl:tex-coord 1.0 0.0)        ; top-right
  (gl:vertex (+ (+ (elt left 0)) (+ (elt up 0)) (elt forw 0))
             (+ (+ (elt left 1)) (+ (elt up 1)) (elt forw 1))
             (+ (+ (elt left 2)) (+ (elt up 2)) (elt forw 2)))

  (gl:tex-coord 0.0 0.0)        ; top-left
  (gl:vertex (+ (- (elt left 0)) (+ (elt up 0)) (elt forw 0))
             (+ (- (elt left 1)) (+ (elt up 1)) (elt forw 1))
             (+ (- (elt left 2)) (+ (elt up 2)) (elt forw 2))))

Now, I can whip through the faces just saying which way is left, which way is up, and which way is forward for that face.

;;; draw textured cube faces (cont.)
;; back face
(cube-face #(1.0 0.0 0.0)  #(0.0 -1.0  0.0) #(0.0 0.0 -1.0))
;; top face
(cube-face #(1.0 0.0 0.0)  #(0.0  0.0 -1.0) #(0.0 1.0 0.0))
;; bottom face
(cube-face #(1.0 0.0 0.0)  #(0.0  0.0  1.0) #(0.0 -1.0 0.0))
;; right face
(cube-face #(0.0 0.0 -1.0) #(0.0  1.0  0.0) #(1.0 0.0 0.0))
;; left face
(cube-face #(0.0 0.0  1.0) #(0.0  1.0  0.0) #(-1.0 0.0 0.0))

And, now we have a textured cube.

Updates In Email

Email:

l