NeHe Tutorial 02: Drawing Triangles and Quadrilaterals June 1st, 2010
Patrick Stein

Introduction

In the previous tutorial, we made a basic shell of a CL-OpenGL application. I have slightly modified it for this tutorial so that it has some hooks where we can add in code specific to this tutorial.

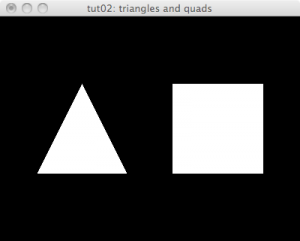
In this tutorial, we’re going to draw a triangle and a quadrilateral in our window. We’re going to start with our simple-tutorial base.

;;; *.lisp
#<:use "simple-tutorial.lisp">

Here is the whole tut02.lisp.

;;; window title
"tut02: triangles and quads"

Drawing triangles and quadrilaterals

In the base display code, we already cleared the color buffer and the depth buffer and reset the modelview matrix. Now, we’re going to translate the modelview matrix so that when we draw our triangle, it is going to be in front of our viewpoint and off to our left. Then, we’ll draw the triangle, translate over toward the right, and draw the quadrilateral.

;;; display extra code
(gl:translate -1.5 0.0 -6.0)    ; translate left and into the screen
#<:use "draw triangle">
(gl:translate 3.0 0.0 0.0)      ; translate right
#<:use "draw quadrilateral">


The parameters to gl:translate are x, y, and z (respectively). After the gl:load-identity, the modelview matrix is centered at the origin with the positive x axis pointing to the right of your screen, the positive y axis pointing up your screen, and the positive z-axis pointing out of your screen.

With the way that we set up the projection matrix in the reshape method, the origin of the modelview space should be dead-center in our window.

Drawing triangles

Now that we’ve moved over to the side a little bit and back a ways, we’re going to draw a triangle. The CL-OpenGL code looks like this:

;;; draw triangle
(gl:with-primitives :triangles  ; start drawing triangles
  (gl:vertex  0.0  1.0  0.0)    ; top vertex
  (gl:vertex -1.0 -1.0  0.0)    ; bottom-left vertex
  (gl:vertex  1.0 -1.0  0.0))   ; bottom-right vertex


The with-primitives form lets OpenGL know how to use the vertexes we’re going to make. In this case, it’s going to make a triangle out of each set of three vertexes. If we had six vertexes there, we’d end up with two triangles.

Here, we drew the vertexes in clockwise order. By default, OpenGL considers this triangle to be facing away from us, then. With our current OpenGL settings, this does not make a difference since OpenGL will draw both front and back faces.

Each call to vertex gives the x, y, and z (respectively) coordinates in the modelview projection for the vertex. You will note that I used floating-point numbers here. I could have easily written them as integers like (gl:vertex 1 -1 0). CL-OpenGL would convert them to floating point numbers for me on the fly. I tend to use floating point constants when possible to try to save it the extra work. I should check, sometime, to be sure though that I don’t pay a boxing/unboxing penalty that negates the benefit.

Drawing quadrilaterals

Drawing quadrilaterals is much like drawing triangles. Here, of course, we need four vertexes.

;;; draw quadrilateral
(gl:with-primitives :quads      ; start drawing quadrilaterals
  (gl:vertex -1.0  1.0  0.0)    ; top-left vertex
  (gl:vertex  1.0  1.0  0.0)    ; top-right vertex
  (gl:vertex  1.0 -1.0  0.0)    ; bottom-right vertex
  (gl:vertex -1.0 -1.0  0.0))   ; bottom-left vertex


In this case, we drew a square. We could draw any convex quadrilateral.

Again, we drew the vertexes in clockwise order. By default, OpenGL considers this triangle to be facing away from us, then. With our current OpenGL settings, this does not make a difference since OpenGL will draw both front and back faces.

Toggling Fullscreen mode

We’re also going to add a slot that keeps track of whether or not our window is full screen.

;;; extra slots
(fullscreen :initarg :fullscreen :reader fullscreen-p)


;;; extra initargs
:fullscreen nil

Then, before we display our window, we’re going to switch to fullscreen mode if this is true.

;;; display-window extra code
(when (fullscreen-p win)        ; check to see if fullscreen needed
  (glut:full-screen))           ; if so, then tell GLUT

Switching based on keyboard event

Here, we add an extra case to the keypress handler. We destroy our window and create a new one with the fullscreen property toggled if we get an 'f' on the keyboard.

;;; keyboard extra cases
((#\f #\F)                      ; when we get an 'f'
                                ; save whether we're in fullscreen
     (let ((full (fullscreen-p win)))
       (glut:close win)         ; close the current window
       (glut:display-window     ; open a new window with fullscreen toggled
           (make-instance 'my-window
                          :fullscreen (not full)))))

NeHe Tutorials for CL-OpenGL June 1st, 2010
Patrick Stein

Introduction

The Neon Helium Productions (NeHe) online tutorials (http://nehe.gamedev.net/) are the best resources available for coders trying to learn specific OpenGL rendering techniques in C/C++. The CL-OpenGL library (http://common-lisp.net/project/cl-opengl/) is, to my mind, the most straightforward mapping of the OpenGL, GLU, and GLUT APIs into Common Lisp. In this series, I hope to combine the best of both so that the aspiring Lisp coder can quickly access these OpenGL techniques.

I am aware that someone else reworked the first six tutorials for CL-OpenGL. However, I can’t track those down any longer. The original website is gone. I am also aware that I won’t have a great deal of time for this sort of coding in the near future, but I hope to tackle a bunch of these this summer. Most of the tutorials are fairly short.

In this first tutorial, we’re going to generate a simple template file that opens an OpenGL window.

;;; *.lisp
#<:use "glut-template.lisp">

Here is the resulting: intro.lisp.

Setting Up CL-OpenGL

To get started with CL-OpenGL, you will need a Lisp implementation that supports ASDF and CFFI, a git client, and OpenGL libraries. I will probably flesh this section out at some later date. For now, I am just barely going to touch on the prerequisites.

Lisp implementation.

CFFI.

git client.

OpenGL libraries. (Under Windows, you may need FreeGlut.dylib.)

Once you have all of the above, you will need to clone the CL-OpenGL repository so that you have the sources on your machine. The CL-OpenGL git repository is http://github.com/3b/cl-opengl.git.

# clone-repository.sh
% cd /where/you/want/to/put/the/cl-opengl/sources
% git clone http://github.com/3b/cl-opengl.git

You need to ensure that the cl-opengl/ directory that you just created is included in your asdf:*central-registry* list. For example, I have this in my ~/.sbclrc file

;;; asdf-prep.lisp
(dolist (subdir (list ;; ... some other packages ...
                      #P"cl-opengl/"))
  (push (merge-pathnames subdir #P"/usr/local/asdf-install/site/")
        asdf:*central-registry*))

Basic Template

Once you have CL-OpenGL installed, you’ll be able to use the following template.

;;; glut-template.lisp
#<:use "load opengl">

(defclass my-window (glut:window)
  ()
  (:default-initargs :width 400 :height 300
                     :title "My Window Title"
                     :x 100 :y 100
                     :mode '(:double :rgb :depth)))

#<:use "initialization method">
#<:use "additional glut methods">

#<:use "create an instance of our window">

Loading OpenGL

Usually, we’re going to load OpenGL, GLU, and GLUT.

;;; load opengl
(require :asdf)                 ; need ASDF to load other things
(asdf:load-system :cl-opengl)   ; load OpenGL bindings
(asdf:load-system :cl-glu)      ; load GLU bindings
(asdf:load-system :cl-glut)     ; load GLUT bindings

Setting up OpenGL

Our initialization method can do anything we need to do in terms of loading textures or fonts or what-have-you. We could do some with the normal CLOS initialize-object method if it is stuff we can do before OpenGL is initialized. For our purposes though, we need to wait until after OpenGL is ready but before our window is displayed so we make sure to go before the glut:display-window call.

;;; initialization method
(defmethod glut:display-window :before ((win my-window))
  #<:use "prepare opengl">
)

To prepare the default OpenGL environment that we’re going to use, we’re first going to turn on smooth shading. This allows colors to blend across our polygons. Later tutorials will go into more detail about smooth shading.

;;; prepare opengl
(gl:shade-model :smooth)        ; enables smooth shading

The next line here sets the color used to clear the screen. OpenGL color values range from zero to one with zero being the darkest and one being the brightest. The parameters here are (in order) the red, green, blue, and alpha channels. The alpha channel doesn’t really come into play when clearing the screen, so it doesn’t much matter in this instance. We’re going to use a black background.

;;; prepare opengl (cont.)
(gl:clear-color 0 0 0 0)        ; background will be black

The next several lines prepare the depth buffer. OpenGL keeps a variety of buffers that are the same dimensions as your window. You were probably expecting the color buffer that stores the actual pixel values that are rendered on the screen. The depth can be used to keep track of the depth of the last item drawn to the screen or to prevent an object from drawing if it doesn’t have a depth thats less than the current value of the depth buffer for the current pixel.

;;; prepare opengl (cont.)
(gl:clear-depth 1)              ; clear buffer to maximum depth
(gl:enable :depth-test)         ; enable depth testing
(gl:depth-func :lequal)         ; okay to write pixel if its depth
                                ; is less-than-or-equal to the
                                ; depth currently written

We are also going to tell OpenGL that we’d like it to make things in perspective look as nice as possible.

;;; prepare opengl (cont.)
                                ; really nice perspective correction
(gl:hint :perspective-correction-hint :nicest)

Display function

Almost all applications will need at least a GLUT display function. Usually, they will do more than this, but this will get us started.

;;; additional glut methods
(defmethod glut:display ((win my-window))
  (gl:clear :color-buffer-bit :depth-buffer-bit)
  (gl:load-identity))

Resizing the window

The following method gets called when your window is first created and any time your window is resized. We will use it to prepare our projection matrix.

;;; additional glut methods (cont.)
(defmethod glut:reshape ((win my-window) width height)
  #<:use "glut reshape -- prepare viewport">
  #<:use "glut reshape -- prepare projection">
  #<:use "glut reshape -- switch to model view">
)

To initialize the viewport, we simply take the given width and height and use them as the horizontal and vertical extents of our coordinate system.

;;; glut reshape -- prepare viewport
(gl:viewport 0 0 width height)  ; reset the current viewport

Next, we’re going to prepare the projection matrix. We’re going to set things up for a perspective view so that distant objects appear smaller than closer objects. We’re going to assume that the window accounts for a 45-degree field of view from left to right. We’re going to assume that objects in our scene can be anywhere from 1/10 to 100 units in front of our viewpoint.

First, we switch into the mode where matrix commands will change the projection matrix. Then, we make sure we’re starting from the identity matrix. Then, we prepare our perspective transformation assuming 45-degrees from left-to-right and a proportional amount from top-to-bottom (taking care not to divide by zero in the proportion).

;;; glut reshape -- prepare projection
(gl:matrix-mode :projection)    ; select the projection matrix
(gl:load-identity)              ; reset the matrix

;; set perspective based on window aspect ratio
(glu:perspective 45 (/ width (max height 1)) 1/10 100)

Once we are done setting up the projection matrix, we need to switch back to the model-view matrix so that further transforms will affect the space we’re viewing rather than where we are viewing things from.

;;; glut reshape -- switch to model view
(gl:matrix-mode :modelview)     ; select the modelview matrix
(gl:load-identity)              ; reset the matrix

Creating and displaying our window

To create and display an instance of our window, we simply go ahead and create and instance and pass it to glut:display-window.

;;; create an instance of our window
(glut:display-window (make-instance 'my-window))

TC Lispers May Presentations online May 27th, 2010
Patrick Stein

The Twin Cities Lisp Users Group meeting for May was last Tuesday.

Teaching Introductory Programming Using Scheme

Daniel Feldman gave this presentation at the TC Lispers meeting in May 2010.

Teaching Introductory Programming Using Scheme on Vimeo.

ASDF2

Robert Goldman gave this lightning talk to the TC Lispers meeting in May 2010.

ASDF2 on Vimeo.

Programming Contest

Patrick Stein gave this lightning talk to the TC Lispers meeting in May 2010.

Programming Contest on Vimeo.

Lightning talk by Patrick Stein to the Twin Cities Lisp Users Group about hosting a Programming Contest. This presentation was recorded on 2010-05-25.

SLIME/noweb-mode/Lisp tip May 7th, 2010
Patrick Stein

Just a quick tip here if you use SLIME for Lisp and use Lisp as a noweb-code-mode…. Either change slime-auto-connect to 'ask or 'always or just remember to start slime before you wander into a Lisp code chunk. If you don’t, noweb-mode gets all confused and won’t code-highlight your Lisp or switch back to doc-mode when you leave that chunk.

I spent a long time just thinking noweb-mode was entirely broken if there were single quotes or less-than signs in any document chunk. Alas, it just needed SLIME to stop chucking a Not connected error.

Getting started with Clojure/Emacs/Slime May 4th, 2010
Patrick Stein

I spent some considerable time yesterday poring over the shelves in the programmer’s section of a local bookstore yesterday. Based on the available jobs at the moment, I was trying to decide whether it would be less painful to learn C#/.NET/AFW/blurpz or Hibernate/Springs/Struts/glorpka. My lambda, those things are fugly. When I open a book to find that my simple database example takes eight XML configuration files and twenty-five lines of calls to the same function (with a 25-character identifier (which, technically, should be namespace qualified, too)), I just don’t want to go there.

So, I walked away with Programming Clojure and a determination to think really hard about how to get paid to do something that’s not intensely painful.

Well, yesterday afternoon and late-night were intensely painful trying to get Clojure/Emacs/Slime all working together. Today, magickly, I messed something up in my .emacs file that convinced swank-clojure to download its own copies of the three JAR files it needs and zoom… I’m out of the gate.

Someday, I’d still like to be able to use my own JAR files for all of this, but in the meantime, I’m up and running.

Here’s what works

This is the relevant configuration from my .emacs file. It draws partly from these instructions by I’m not sure who, partly from this message by Constantine Vetoshev, partly from how my .emacs file was previously arranged, partly from sources now lost in the browser history sea, and partly from sheer luck.

First, some generic stuff up at the beginning:

(defun add-subdirs-to-load-path (dir)
  (let ((default-directory (concat dir "/")))
    (normal-top-level-add-subdirs-to-load-path)))

(add-to-list 'load-path "~/.emacs.d/site-lisp")
(add-subdirs-to-load-path "~/.emacs.d/site-lisp")

Then, prepping slime a bit:

(require 'slime-autoloads)
(add-to-list 'load-path "~/.emacs.d/site-lisp/slime/contrib")

(add-hook 'lisp-mode-hook (lambda () (slime-mode t)))
(add-hook 'inferior-lisp-mode-hook (lambda () (inferior-slime-mode t)))
(setq common-lisp-hyperspec-root
      "file:///Developer/Documentation/Lisp/clhs/HyperSpec/")

(slime-setup '(slime-repl))

(setq slime-net-coding-system 'utf-8-unix)

Then, setting up some general stuff for easy lisp implementations. (The –sbcl-nolineedit is something I personally use in my .sbclrc to decide whether to load linedit.)

(setq slime-lisp-implementations
      '((sbcl ("sbcl" "--sbcl-nolineedit"))
        (ccl ("ccl"))
        (ccl64 ("ccl64"))))

Some commands to simplify things so I don’t have to remember to M–– M-x slime:

(defmacro defslime-start (name mapping)
  `(defun ,name ()
     (interactive)
     (let ((slime-default-lisp ,mapping))
       (slime))))

(defslime-start ccl 'ccl)
(defslime-start ccl64 'ccl64)
(defslime-start clojure 'clojure)
(defslime-start sbcl 'sbcl)

Then, Clojure-specific SLIME stuff

(autoload 'clojure-mode "clojure-mode" "A major mode for Clojure" t)
(add-to-list 'auto-mode-alist '("\\.clj$" . clojure-mode))
(require 'swank-clojure)

(setq slime-lisp-implementations
      (append slime-lisp-implementations
              `((clojure ,(swank-clojure-cmd) :init swank-clojure-init))))

And, a touch more slime stuff to make things a little happier.

(add-hook 'slime-mode-hook
          (lambda ()
            (setq slime-truncate-lines nil)
            (slime-redirect-inferior-output)))

In my .emacs.d/site-lisp, I did the following:

% rm -rf slime swank-clojure clojure-mode
% git clone git://git.boinkor.net/slime.git
% git clone http://github.com/technomancy/swank-clojure.git
% git clone http://github.com/jochu/clojure-mode.git

What didn’t work

Before accidentally triggering swank-clojure to download its own JARs, I tried installing what I could with ELPA. I tried installing clojure, clojure-contrib, and swank-clojure with Lein. I tried installing them with Maven. I tried various combinations of versions of clojure and swank-clojure.

I have no idea how the JARs that swank-clojure built itself got built. I cannot reproduce it.

Edit: Ah, it appears that the Subversion repository for Clojure that I found is deprecated. But, I don’t have the energy to try the git repository myself at this point. Maybe next week.

Updates In Email

Email:

l