Roto-Mortar: A 7-Day Lisp Game March 26th, 2010
Patrick Stein

Roto Mortar was written for the 2010 LISP Game Design Challenge. The challenge was to design and implement a game in seven days using some LISP dialect.

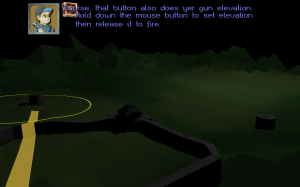
The KPs have been beating on your base all week. Your defenses are just about to collapse. In fact, your mortar cannons are both on the fritz. Billy Bob, the ACME Repair Guy, has just gotten one of your mortar cannons back online. Unfortunately, he had to wire things a little wonky. Your cannon is spinning all on its own. You’ve only got one button to control both the elevation of the cannon and when to fire it. And, you better fire it, because the KPs are still coming at you.

Inspiration

A few years ago, I read the book Game Design Workshop: Designing, Prototyping, and Playtesting Games. One of the exercises in the first chapter is to design a game with a “one-button interface”. At the time, I didn’t come up with anything particularly thrilling.

When I started brainstorming what to do for this Game Challenge, I remembered that exercise. I came up with this concept just under (as in 3.5 hours under) seven days ago. The game is nowhere near as polished as I’d like… but it was a 7-day thing. And, it was fun to take a break from Objective C to get back to some Lisp programming.

Obtaining It

You can find out more about the game, including where to get the source and a Mac OS X binary, on the game’s web page.

XML Parser Generator March 16th, 2010
Patrick Stein

A few years back (for a very generous few), we needed to parse a wide variety of XML strings. It was quite tedious to go from the XML to the native-language representations of the data (even from a DOM version). Furthermore, we needed to parse this XML both in Java and in C++.

I wrote (in Java) an XML parser generator that took an XML description of how you’d like the native-language data structures to look and where in the XML it could find the values for those data structures. The Java code-base for this was ugly, ugly, ugly. I tried several times to clean it up into something publishable. I tried to clean it up several times so that it could actually generate the parser it used to read the XML description file. Alas, the meta-ness, combined with the clunky Java code, kept me from completing the circle.

Fast forward to last week. Suddenly, I have a reason to parse a wide variety of XML strings in Objective C. I certainly didn’t want to pull out the Java parser generator and try to beat it into generating Objective C, too. That’s fortunate, too, because I cannot find any of the copies (in various states of repair) that once lurked in ~/src.

What’s a man to do? Write it in Lisp, of course.

Example

Here’s an example to show how it works. Let’s take some simple XML that lists food items on a menu:

<menu>
        <food name="Belgian Waffles" price="$5.95" calories="650">
                <description>two of our famous Belgian Waffles with plenty of real maple syrup</description>
        </food>
        <!-- ... more food entries, omitted here for brevity ... -->
</menu>

We craft an XML description of how to go from the XML into a native representation:

<parser_generator root="menu" from="/menu">
  <struct name="food item">
    <field type="string" name="name" from="@name" />
    <field type="string" name="price" from="@price" />
    <field type="string" name="description" from="/description/." />
    <field type="integer" name="calories" from="@calories" />
  </struct>

  <struct name="menu">
    <field name="menu items">
      <array>
        <array_element type="food item" from="/food" />
      </array>
    </field>
  </struct>
</parser_generator>

Now, you run the parser generator on the above input file:

% sh parser-generator.sh --language=lisp \
                           --types-package menu \
                           --reader-package menu-reader \
                           --file menu.xml

This generates two files for you: types.lisp and reader.lisp. This is what types.lisp looks like:

(defpackage :menu
  (:use :common-lisp)
  (:export #:food-item
             #:name
             #:price
             #:description
             #:calories
           #:menu
             #:menu-items))

(in-package :menu)

(defclass food-item ()
  ((name :initarg :name :type string)
   (price :initarg :price :type string)
   (description :initarg :description :type string)
   (calories :initarg :calories :type integer)))

(defclass menu ()
  ((menu-items :initarg :menu-items :type list :initform nil)))

I will not bore you with all of reader.lisp as it’s 134 lines of code you never had to write. The only part you need to worry about is the parse function which takes a stream for or pathname to the XML and returns an instance of the menu class. Here is a small snippet though:

;;; =================================================================
;;; food-item struct
;;; =================================================================
(defmethod data progn ((handler sax-handler) (item food-item) path value)
  (with-slots (name price description calories) item
    (case path
      (:|@name| (setf name value))
      (:|@price| (setf price value))
      (:|/description/.| (setf description value))
      (:|@calories| (setf calories (parse-integer value))))))

Where it’s at

I currently have the parser generator generating its own parser (five times fast). I still have a little bit more that I’d like to add to include assertions for things like the minimum number of elements in an array or the minimum value of an integer. I also have a few kinks to work out so that you can return some type other than an instance of a class for cases like this where the menu class just wraps one item.

My next step though is to get it generating Objective C parsers.

Somewhere in there, I’ll post this to a public git repository.

Better Text Rendering with CL-OpenGL and ZPB-TTF January 19th, 2010
Patrick Stein

Last month, I posted some code for rendering text under CL-OpenGL with ZPB-TTF. Toward the very end of that post, I said:

Technically, that check with the squared distance from the calculated midpoint to the segment midpoint shouldn’t just compare against the number one. It should be dynamic based on the current OpenGL transformation. I should project the origin and the points and through the current OpenGL projections, then use the reciprocal of the maximum distance those projected points are from the projected origin in place of the one. Right now, I am probably rendering many vertexes inside each screen pixel.

It was pretty obvious that when you tried to render something very small, it looked quite jaggy and much more solid than you would expect.


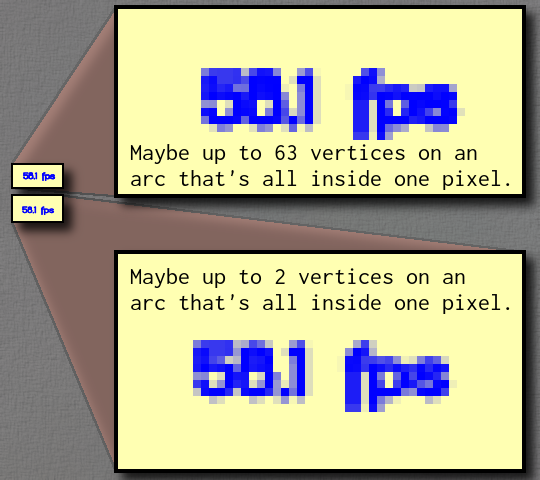
As you can see in the above image, the old version was placing up to 63 vertices for the same parabolic arc within a pixel. The new code is much more careful about this and will only place two vertices from a given parabolic arc within a pixel. You can see that in the upper rendering, the s is almost totally obliterated and the tiny bits sticking down from the 5 and 8 are much darker than in the lower rendering.

Here is the new code:

  • draw: better anti-aliasing
  • gl: smaller ‘frames-per-second’ indicator and some parameters to make it easier to toggle the main display
  • test: small tweak to make it work better under SLIME

Using a better cutoff value

The squared distance check that I mentioned now employs a cutoff value:

(defun interpolate (sx sy ex ey int-x int-y cutoff &optional (st 0) (et 1))
  (let ((mx (/ (+ sx ex) 2.0))
        (my (/ (+ sy ey) 2.0))
        (mt (/ (+ st et) 2.0)))
    (let ((nx (funcall int-x mt))
          (ny (funcall int-y mt)))
      (let ((dx (- mx nx))
            (dy (- my ny)))
        (when (< (* cutoff cutoff) (+ (* dx dx) (* dy dy)))
          (interpolate sx sy nx ny int-x int-y cutoff st mt)
          (gl:vertex nx ny)
          (interpolate nx ny ex ey int-x int-y cutoff mt et))))))

I have tweaked the (render-string …) and (render-glyph …) accordingly to propagate that value down to the interpolate function, and I have added a method to calculate the appropriate cutoff value.

Calculating the appropriate cutoff value

The appropriate cutoff value depends upon the font, the desired rendering size in viewport coordinates, and the current OpenGL transformations. The basic idea is that I prepare the OpenGL transformation the same way that I will later do for rendering the font; I will reverse-project (0,0), (1,0), and (0,1); I will calculate the distances from the reverse-projected (0,0) to each of the other two reverse-projected points; and then I will take half of that as my cutoff value. This effectively means that once the midpoint of my parabola arc is within half of a screen pixel of where the midpoint of a line segment would be, I just use a line segment.

(defun calculate-cutoff (font-loader size)
  (gl:with-pushed-matrix
    (let ((ss (/ size (zpb-ttf:units/em font-loader))))
      (gl:scale ss ss ss)

      (let ((modelview (gl:get-double :modelview-matrix))
            (projection (gl:get-double :projection-matrix))
            (viewport (gl:get-integer :viewport)))
        (labels ((dist (x1 y1 z1 x2 y2 z2)
                   (max (abs (- x1 x2))
                        (abs (- y1 y2))
                        (abs (- z1 z2))))
                 (dist-to-point-from-origin (px py pz ox oy oz)
                   (multiple-value-bind (nx ny nz)
                       (glu:un-project px py pz
                                       :modelview modelview
                                       :projection projection
                                       :viewport viewport)
                     (dist nx ny nz ox oy oz))))
          (multiple-value-bind (ox oy oz)
              (glu:un-project 0.0 0.0 0.0
                              :modelview modelview
                              :projection projection
                              :viewport viewport)
            (/ (min (dist-to-point-from-origin 1 0 0 ox oy oz)
                    (dist-to-point-from-origin 0 1 0 ox oy oz))
               2)))))))

Woolly Application Underway December 14th, 2009
Patrick Stein

I started building an application on top my Sheeple/CL-OpenGL library Woolly.

I coach a volleyball team. I often sit down with a piece of paper and try to determine new serve-receive and defensive positions for my team. This is quite tedious because I can’t just move the players around on the page. Additionall, I have to figure this out for all six rotations while keeping the overlap requirements in mind the whole time.

I tried once doing it with cut-out players. This worked better, but still suffered from having to track the rotations and overlap requirements all myself.

rotations After adding checkboxes to Woolly, I had a usable application for doing these rotations in 300 lines of code. Yellow are front-row players, blue are back-row players, and green are sidelined players. It still needs some work so that I can change player identifiers, substitute players in off the bench, save/load the rotations, and make print-outs.

I’m not sure yet whether I’m going to print just by slurping the OpenGL buffer into ZPNG, or if I am going to make a separate callback hierarchy for printing with Vecto or CL-PDF so that I can print at higher than screen resolution.

I’m also having trouble getting SBCL’s save-lisp-and-die function happy with the whole CL-OpenGL setup under MacOSX. I thought I had figured this out before. Alas, my own hacked version of CL-OpenGL isn’t working any better for me than the current CL-OpenGL release is when I try to run the saved image. *shrug* I’ll fight with that later.

Rendering Text in CL-OpenGL with ZPB-TTF December 9th, 2009
Patrick Stein

I promised in an earlier post that I would share my code for rendering anti-aliased text in CL-OpenGL using ZPB-TTF to load the fonts.

Overview

I use a three step process to render a string. First, I render the outline of the string using anti-alised lines. Then, I render the string as solid polygons into the stencil buffer. Then, I fill a rectangle having OpenGL only fill where the stencil buffer is set.

Why the three-step process? OpenGL can draw polygons. In fact, it can draw anti-aliased polygons. However, it can only draw convex polygons. Most of the polygons involved in fonts are non-convex. The stencil buffer, however, has a drawing mode where you can flip the bits of the value in the stencil buffer each time OpenGL goes to write to it.

Imagine for a moment the letter O. It is made of two separate contours… one for the exterior of the circle and one for the interior of the circle. If I rendered each of these to the color buffer in OpenGL, I would end up with one big filled in circle. However, if I render each of these to the stencil buffer with the invert operation, then I end up setting all of the bits in the filled circle area when I draw the exterior contour and turning the middle bits off again when I render the internal contour. I am left with only the bits in the letter itself filled in.

The same sort of thing works even for more complicated letters like the letter C. As I am progressing along the outer edge, I am inadvertently filling the interior region. But, as I progress along the inner edge, I am inadvertently erasing that region again.

Once I am done, I use the stencil buffer as a stencil, draw a rectangle over it, and Bob’s your uncle.

The problem with the stencil buffer is that it has no subtlety. Bits are either set in it or not. So, I cannot anti-alias in the stencil buffer. I am left to draw the outline with anti-aliased lines.

Here are the relevant files:

  • draw.lisp: The code which actually draws strings in a given font.
  • gl.lisp: The code that makes a basic OpenGL window and invokes the font rendering on a given font and string.
  • test.lisp: Some simple code that loads the required libraries and opens a window.

The test program assumes that okolaksRegular.ttf is in your current directory. Tweak it to some TTF you do have. Or, get Okolaks itself.

Drawing a string

Here is the basic outline of the string drawing function. I am centering the string at the origin. I first calculate the bounding box. Then, I determine the scaling factor needed to get from the font-units into my own units and I scale the universe accordingly. Then, I translate the universe to center the bounding box. Then, I draw the anti-aliased outline of the text. If desired, I then draw the filled text to the stencil buffer and paint in the stencil.

(defun draw-string (font-loader string &key (size 48) (filled t))
  (gl:with-pushed-matrix
    (let* ((box (zpb-ttf:string-bounding-box string font-loader :kerning t))
           (bx1 (aref box 0))
           (by1 (aref box 1))
           (bx2 (aref box 2))
           (by2 (aref box 3)))

      (let ((ss (/ size (zpb-ttf:units/em font-loader))))
        (gl:scale ss ss 1))

      (gl:translate (/ (- bx1 bx2) 2) (/ (- by1 by2) 2) 0)
 
      (gl:with-pushed-attrib (:current-bit :color-buffer-bit :line-bit
                                           :hint-bit :stencil-buffer-bit)
      <<draw antialiased lines>>
      (when filled
        <<fill stencil buffer with filled-in-glyph>>
        <<fill in area subject to stencil>>)))))

To draw antialiased lines, I turn on blending. I tell it to blend the color in according to the alpha value of the portion of line it is trying to draw. I tell it to draw smooth lines in the nicest way it knows how. Then, I save the transformation-state so that I can move around inside the actual string rendering and still get back to this exact same place later. When I am done, I no longer need blending.

(gl:enable :blend)
(gl:blend-func :src-alpha :one-minus-src-alpha)
(gl:enable :line-smooth)
(gl:hint :line-smooth-hint :nicest)
(gl:with-pushed-matrix
    (render-string string font-loader nil))

To fill stencil buffer with filled-in-glyph, I turn off writing to the color buffer. I turn on the stencil testing. I set myself up to use a 1-bit stencil buffer. I set the buffer up so that when I clear it, it will all be zero-ed. I clear the stencil buffer. I set the stencil test to always write one bit. And, I set the stencil buffer to always write in invert mode. Then, I draw the string filled.

(gl:color-mask nil nil nil nil)
(gl:enable :stencil-test)
(gl:stencil-mask 1)
(gl:clear-stencil 0)
(gl:clear :stencil-buffer-bit)
(gl:stencil-func :always 1 1)
(gl:stencil-op :invert :invert :invert)
(gl:with-pushed-matrix
    (render-string string font-loader t))

To fill in area subject to stencil, I set myself up again to write to the color buffer. I set up the stencil test to let me write to my buffers only where the stencil is set to one. Then, I draw a filled rectangle over the whole bounding box.

(gl:color-mask t t t t)
(gl:stencil-func :equal 1 1)
(gl:with-primitives :quads
  (gl:vertex bx1 by1)
  (gl:vertex bx2 by1)
  (gl:vertex bx2 by2)
  (gl:vertex bx1 by2))

Rendering the string

To render the string, I loop through each character in it. For characters other than the first one, I adjust their position based on the kerning offset. Then, I render the character glyph and adjust the position so that I am ready to start the next character.

(defun render-string (string font-loader fill)
  (loop :for pos :from 0 :below (length string)
     :for cur = (zpb-ttf:find-glyph (aref string pos) font-loader)
     :for prev = nil :then cur
     :do (when prev
           (gl:translate (- (zpb-ttf:kerning-offset prev cur font-loader)
                            (zpb-ttf:left-side-bearing cur))
                         0 0))
         (render-glyph cur (if fill :polygon :line-strip))
         (gl:translate (zpb-ttf:advance-width cur) 0 0)))

Rendering a glyph

Here’s where the rubber really meets the road. My render-glyph function takes two arguments: a glyph and the mode in which to render it. The mode is :polygon for filled polygons and :line-strip for just the outline.

I loop through each contour in the glyph. With each contour, I tell OpenGL that I am going to render either a single polygon or a single line strip (according to the mode). To render the contour then, I loop through each contour segment. Each contour segment is either a straight line or a quadratic spline. If it is a straight line, then I have it easy. I just have to render the end points. If it is a spline, I have to render the starting point, create some interpolators to interpolate points along the spline, use those interpolators, and then render the end point.

(defun render-glyph (glyph mode)
  (zpb-ttf:do-contours (contour glyph)
    (gl:with-primitives mode
      (zpb-ttf:do-contour-segments (start ctrl end) contour
        (let ((sx (zpb-ttf:x start))
              (sy (zpb-ttf:y start))
              (cx (when ctrl (zpb-ttf:x ctrl)))
              (cy (when ctrl (zpb-ttf:y ctrl)))
              (ex (zpb-ttf:x end))
              (ey (zpb-ttf:y end)))
          (gl:vertex sx sy)
          (when ctrl
            (let ((int-x (make-interpolator sx cx ex))
                  (int-y (make-interpolator sy cy ey)))
              (interpolate sx sy ex ey int-x int-y)))
          (gl:vertex ex ey))))))

The starting point of one contour segment is always the ending point of the previous contour segment. So, if I wanted to bother, I could save myself a few OpenGL calls by remembering the first starting point of the first segment of the contour, not rendering the end points of any contour segment, and then rendering the starting point of the first segment again at the end (when I’m in outline mode). Instead, for clarity, I just always render the end point.

Making spline interpolators

If I want to make an quadratic spline that goes from x_0 to x_1 with control point c as time t goes from zero to one, I would use the polynomial (x_0 - 2c + x_1) t^2 + 2( c - x_0 ) t + x_0. So, given the parameters of a contour segment, I’m going to create interpolators for the x and y coordinates independently like so:

(defun make-interpolator (ss cc ee)
  (let ((xx (+ ss (* -2 cc) ee))
        (yy (* 2 (- cc ss)))
        (zz ss))
    #'(lambda (tt)
        (+ (* xx tt tt) (* yy tt) zz))))

Interpolating the spline

To interpolate the spline, I use a recursive function. It is given the x and y coordinates of the starting and ending points for the current portion of the spline, the starting and ending time coordinates of the current portion of the spline, and the interpolators created above. From there, it calculates the midpoint of a line segment from the start to the end and the x and y coordinates that the midpoint should be at based on the spline interpolator functions. If the calculated spline midpoint is really close to the line-segment midpoint, we just break off the recursion. If it is not really close, then we interpolate the first half of the current portion, render the calculated spline portion midpoint, and interpolate the second half of the current portion.

(defun interpolate (sx sy ex ey int-x int-y &optional (st 0) (et 1))
  (let ((mx (/ (+ sx ex) 2.0))
        (my (/ (+ sy ey) 2.0))
        (mt (/ (+ st et) 2.0)))
    (let ((nx (funcall int-x mt))
          (ny (funcall int-y mt)))
      (let ((dx (- mx nx))
            (dy (- my ny)))
        (when (< 1 (+ (* dx dx) (* dy dy)))
          (interpolate sx sy nx ny int-x int-y st mt)
          (gl:vertex nx ny)
          (interpolate nx ny ex ey int-x int-y mt et))))))

Technically, that check with the squared distance from the calculated midpoint to the segment midpoint shouldn’t just compare against the number one. It should be dynamic based on the current OpenGL transformation. I should project the origin and the points (1,0) and (0,1) through the current OpenGL projections, then use the reciprocal of the maximum distance those projected points are from the projected origin in place of the one. Right now, I am probably rendering many vertexes inside each screen pixel.

Summary

So, there you have it. Should you ever need to render text in CL-OpenGL, I hope this saves you many hours of trial-and-error and keeps you from resorting to rendering the glyphs to a texture map and dealing with how poorly they scale.

Updates In Email

Email:

l