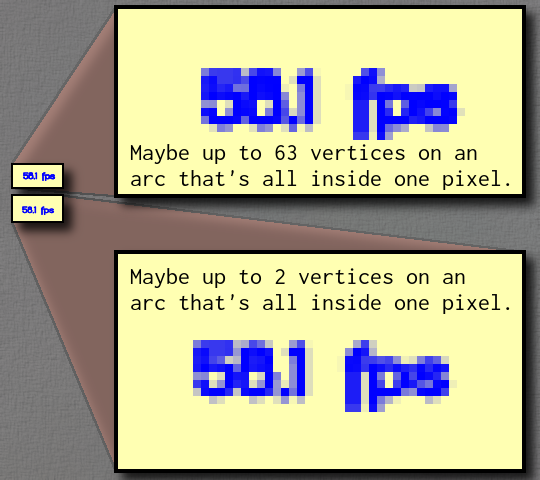
I promised in an earlier post that I would share my code for rendering anti-aliased text in CL-OpenGL using ZPB-TTF to load the fonts.
Overview
I use a three step process to render a string. First, I render the outline of the string using anti-alised lines. Then, I render the string as solid polygons into the stencil buffer. Then, I fill a rectangle having OpenGL only fill where the stencil buffer is set.
Why the three-step process? OpenGL can draw polygons. In fact, it can draw anti-aliased polygons. However, it can only draw convex polygons. Most of the polygons involved in fonts are non-convex. The stencil buffer, however, has a drawing mode where you can flip the bits of the value in the stencil buffer each time OpenGL goes to write to it.
Imagine for a moment the letter O
. It is made of two separate contours… one for the exterior of the circle and one for the interior of the circle. If I rendered each of these to the color buffer in OpenGL, I would end up with one big filled in circle. However, if I render each of these to the stencil buffer with the invert operation, then I end up setting all of the bits in the filled circle area when I draw the exterior contour and turning the middle bits off again when I render the internal contour. I am left with only the bits in the letter itself filled in.
The same sort of thing works even for more complicated letters like the letter C
. As I am progressing along the outer edge, I am inadvertently filling the interior region. But, as I progress along the inner edge, I am inadvertently erasing that region again.
Once I am done, I use the stencil buffer as a stencil, draw a rectangle over it, and Bob’s your uncle.
The problem with the stencil buffer is that it has no subtlety. Bits are either set in it or not. So, I cannot anti-alias in the stencil buffer. I am left to draw the outline with anti-aliased lines.
Here are the relevant files:
- draw.lisp: The code which actually draws strings in a given font.
- gl.lisp: The code that makes a basic OpenGL window and invokes the font rendering on a given font and string.
- test.lisp: Some simple code that loads the required libraries and opens a window.
The test program assumes that okolaksRegular.ttf
is in your current directory. Tweak it to some TTF you do have. Or, get Okolaks itself.
Drawing a string
Here is the basic outline of the string drawing function. I am centering the string at the origin. I first calculate the bounding box. Then, I determine the scaling factor needed to get from the font-units into my own units and I scale the universe accordingly. Then, I translate the universe to center the bounding box. Then, I draw the anti-aliased outline of the text. If desired, I then draw the filled text to the stencil buffer and paint in the stencil.
(defun draw-string (font-loader string &key (size 48) (filled t))
(gl:with-pushed-matrix
(let* ((box (zpb-ttf:string-bounding-box string font-loader :kerning t))
(bx1 (aref box 0))
(by1 (aref box 1))
(bx2 (aref box 2))
(by2 (aref box 3)))
(let ((ss (/ size (zpb-ttf:units/em font-loader))))
(gl:scale ss ss 1))
(gl:translate (/ (- bx1 bx2) 2) (/ (- by1 by2) 2) 0)
(gl:with-pushed-attrib (:current-bit :color-buffer-bit :line-bit
:hint-bit :stencil-buffer-bit)
<<draw antialiased lines>>
(when filled
<<fill stencil buffer with filled-in-glyph>>
<<fill in area subject to stencil>>)))))
To draw antialiased lines
, I turn on blending. I tell it to blend the color in according to the alpha value of the portion of line it is trying to draw. I tell it to draw smooth lines in the nicest way it knows how. Then, I save the transformation-state so that I can move around inside the actual string rendering and still get back to this exact same place later. When I am done, I no longer need blending.
(gl:enable :blend)
(gl:blend-func :src-alpha :one-minus-src-alpha)
(gl:enable :line-smooth)
(gl:hint :line-smooth-hint :nicest)
(gl:with-pushed-matrix
(render-string string font-loader nil))
To fill stencil buffer with filled-in-glyph
, I turn off writing to the color buffer. I turn on the stencil testing. I set myself up to use a 1-bit stencil buffer. I set the buffer up so that when I clear it, it will all be zero-ed. I clear the stencil buffer. I set the stencil test to always write one bit. And, I set the stencil buffer to always write in invert
mode. Then, I draw the string filled.
(gl:color-mask nil nil nil nil)
(gl:enable :stencil-test)
(gl:stencil-mask 1)
(gl:clear-stencil 0)
(gl:clear :stencil-buffer-bit)
(gl:stencil-func :always 1 1)
(gl:stencil-op :invert :invert :invert)
(gl:with-pushed-matrix
(render-string string font-loader t))
To fill in area subject to stencil
, I set myself up again to write to the color buffer. I set up the stencil test to let me write to my buffers only where the stencil is set to one. Then, I draw a filled rectangle over the whole bounding box.
(gl:color-mask t t t t)
(gl:stencil-func :equal 1 1)
(gl:with-primitives :quads
(gl:vertex bx1 by1)
(gl:vertex bx2 by1)
(gl:vertex bx2 by2)
(gl:vertex bx1 by2))
Rendering the string
To render the string, I loop through each character in it. For characters other than the first one, I adjust their position based on the kerning offset. Then, I render the character glyph and adjust the position so that I am ready to start the next character.
(defun render-string (string font-loader fill)
(loop :for pos :from 0 :below (length string)
:for cur = (zpb-ttf:find-glyph (aref string pos) font-loader)
:for prev = nil :then cur
:do (when prev
(gl:translate (- (zpb-ttf:kerning-offset prev cur font-loader)
(zpb-ttf:left-side-bearing cur))
0 0))
(render-glyph cur (if fill :polygon :line-strip))
(gl:translate (zpb-ttf:advance-width cur) 0 0)))
Rendering a glyph
Here’s where the rubber really meets the road. My render-glyph
function takes two arguments: a glyph and the mode in which to render it. The mode is :polygon
for filled polygons and :line-strip
for just the outline.
I loop through each contour in the glyph. With each contour, I tell OpenGL that I am going to render either a single polygon or a single line strip (according to the mode). To render the contour then, I loop through each contour segment. Each contour segment is either a straight line or a quadratic spline. If it is a straight line, then I have it easy. I just have to render the end points. If it is a spline, I have to render the starting point, create some interpolators to interpolate points along the spline, use those interpolators, and then render the end point.
(defun render-glyph (glyph mode)
(zpb-ttf:do-contours (contour glyph)
(gl:with-primitives mode
(zpb-ttf:do-contour-segments (start ctrl end) contour
(let ((sx (zpb-ttf:x start))
(sy (zpb-ttf:y start))
(cx (when ctrl (zpb-ttf:x ctrl)))
(cy (when ctrl (zpb-ttf:y ctrl)))
(ex (zpb-ttf:x end))
(ey (zpb-ttf:y end)))
(gl:vertex sx sy)
(when ctrl
(let ((int-x (make-interpolator sx cx ex))
(int-y (make-interpolator sy cy ey)))
(interpolate sx sy ex ey int-x int-y)))
(gl:vertex ex ey))))))
The starting point of one contour segment is always the ending point of the previous contour segment. So, if I wanted to bother, I could save myself a few OpenGL calls by remembering the first starting point of the first segment of the contour, not rendering the end points of any contour segment, and then rendering the starting point of the first segment again at the end (when I’m in outline mode). Instead, for clarity, I just always render the end point.
Making spline interpolators
If I want to make an quadratic spline that goes from  to
to  with control point
  as time
  goes from zero to one, I would use the polynomial
  . So, given the parameters of a contour segment, I’m going to create interpolators for the x and y coordinates independently like so:
(defun make-interpolator (ss cc ee)
(let ((xx (+ ss (* -2 cc) ee))
(yy (* 2 (- cc ss)))
(zz ss))
#'(lambda (tt)
(+ (* xx tt tt) (* yy tt) zz))))
Interpolating the spline
To interpolate the spline, I use a recursive function. It is given the x and y coordinates of the starting and ending points for the current portion of the spline, the starting and ending time coordinates of the current portion of the spline, and the interpolators created above. From there, it calculates the midpoint of a line segment from the start to the end and the x and y coordinates that the midpoint should be at based on the spline interpolator functions. If the calculated spline midpoint is really close to the line-segment midpoint, we just break off the recursion. If it is not really close, then we interpolate the first half of the current portion, render the calculated spline portion midpoint, and interpolate the second half of the current portion.
(defun interpolate (sx sy ex ey int-x int-y &optional (st 0) (et 1))
(let ((mx (/ (+ sx ex) 2.0))
(my (/ (+ sy ey) 2.0))
(mt (/ (+ st et) 2.0)))
(let ((nx (funcall int-x mt))
(ny (funcall int-y mt)))
(let ((dx (- mx nx))
(dy (- my ny)))
(when (< 1 (+ (* dx dx) (* dy dy)))
(interpolate sx sy nx ny int-x int-y st mt)
(gl:vertex nx ny)
(interpolate nx ny ex ey int-x int-y mt et))))))
Technically, that check with the squared distance from the calculated midpoint to the segment midpoint shouldn’t just compare against the number one. It should be dynamic based on the current OpenGL transformation. I should project the origin and the points  and
and  through the current OpenGL projections, then use the reciprocal of the maximum distance those projected points are from the projected origin in place of the one. Right now, I am probably rendering many vertexes inside each screen pixel.
Summary
So, there you have it. Should you ever need to render text in CL-OpenGL, I hope this saves you many hours of trial-and-error and keeps you from resorting to rendering the glyphs to a texture map and dealing with how poorly they scale.

,
, and
; I will calculate the distances from the reverse-projected
to each of the other two reverse-projected points; and then I will take half of that as my cutoff value. This effectively means that once the midpoint of my parabola arc is within half of a screen pixel of where the midpoint of a line segment would be, I just use a line segment.

