NeHe Tutorial 06: Textured solids June 2nd, 2010
Patrick Stein

Introduction

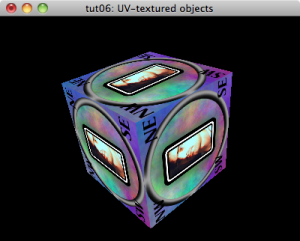
In the previous tutorial, we drew a rotating pyramid and a rotating cube. The next NeHe tutorial renders a textured cube rotating at different speeds around each axis.

Again, we’re going to start with our simple-tutorial base.

;;; *.lisp
#<:use "simple-tutorial.lisp">

Here is the resulting tut06.lisp.

;;; window title
"tut06: UV-textured objects"

The texture

We’re going to use a slot in our window class to store the texture. Note: it might be nice some day to break the cube out into its own class which could store its own position, rotation, and texture. For now though, we’re just going to keep piling stuff into our window class.

;;; extra slots
(texture-id :initform nil :accessor texture-id)

Loading the texture

To load the texture, I’m going to use the CL-PNG wrapper around the PNG library. So, let’s get it loaded.

;;; extra decls
(asdf:load-system :png)

Then, I’m going to need some function that reads in a PNG and creates an OpenGL texture from it. I’m going to make my function take a filename for the PNG image and an optional texture id to use for the texture. (If you don’t pass in a texture id, one is created using gl:gen-textures. The argument to gl:gen-textures tells OpenGL how many textures you want to reserve. You can call gl:gen-textures multiple times. I’m not sure what benefit, if any, you get from allocating several of them simultaneously.)

So, we’re going to open the file and decode the PNG. Then, we’re going to try to turn it into a texture. If we succeed, then we’re going to

;;; extra decls (cont.)
(defun load-png ( filename &optional (texture-id (car (gl:gen-textures 1))
                                                 texture-id-p) )
  (flet (#<:use "load-png: load-and-decode image">)
    (handler-case
        (let ((png (load-and-decode filename)))
          (assert png)          ; make sure we got the png
          #<:use "load-png: turn png into a texture">
          texture-id)           ; return the texture-id on success

        #<:use "load-png: handle errors">
        )))

To load the image, we’re going to open the file and decode it. We have to make sure to open the file for binary input.

;;; load-png: load-and-decode image
(load-and-decode (filename)
  (with-open-file (in filename
                      :element-type '(unsigned-byte 8))
    (png:decode in)))

To turn the PNG into a texture, we first have to make sure that OpenGL knows that we’re going to start tweaking this particular texture. To do that, we use bind-texture and tell it we’re working with a two-dimensional texture here. (OpenGL supports 1-, 2-, and 3-dimensional textures.)

;;; load-png: turn png into a texture
(gl:bind-texture :texture-2d texture-id)

Now, we’re going to need to hand OpenGL our texture data. The CL-PNG library keeps our data in a three-dimensional array (width, height, channels). We need to get this down to a one-dimensional array for OpenGL. Fortunately, we can take advantage of the fact that Common Lisp arrays are stored contiguously. We’ll create an array called data that is a one-dimensional view into our three-dimensional array and let OpenGL copy from it.

;;; load-png: turn png into a texture (cont.)
(let ((ww (png:image-width png))
      (hh (png:image-height png))
      (cc (png:image-channels png)))
  (let ((data (make-array (list (* ww hh cc))
                          :element-type (array-element-type png)
                          :displaced-to png)))
    #<:use "load-png: copy data to texture">
    #<:use "load-png: set up texture filters">))

To copy the data into the texture, we need to tell OpenGL how the data is laid out.

;;; load-png: copy data to texture
(let ((level-of-detail 0)
      (internal-format #<:use "load-png: determine internal-format">)
      (border 0)
      (format #<:use "load-png: determine format">)
      (data-type #<:use "load-png: determine data-type">))
  (gl:tex-image-2d :texture-2d
                   level-of-detail
                   internal-format
                   ww
                   hh
                   border
                   format
                   data-type
                   data))


The level-of-detail is used if we’re going to manually specify what this image looks like at different resolutions. For our purposes in this tutorial, we’re just going to let OpenGL handle all of the scaling for our texture so we’ll stick with the default level of detail.

The internal-format tells OpenGL what type of texture this is going to be. We’re going to use the number of bits per sample and the number image channels to figure out what format this texture should be inside OpenGL.

;;; load-png: determine internal-format
(ecase (png:image-bit-depth png)
  (8  (ecase cc
        (1 :luminance8)
        (2 :luminance8-alpha8)
        (3 :rgb8)
        (4 :rgba8)))
  (16 (ecase cc
        (1 :luminance16)
        (2 :luminance16-alpha16)
        (3 :rgb16)
        (4 :rgba16))))

The border parameter can be either zero or one. If it is zero, then the image width and height must be a power of two. If it is one, then the image width and height must be two plus a power of two. For our purposes, we’re just going to assume that the image is a power of two in width and height.

The format parameter declares what kind of data we have in our array. We’re going to use the number of image channels to come up with the right value here. With the internal format, we were able to blend both the size of the samples and the meaning of the samples into one parameter. For our input data, we give both format and data-type.

;;; load-png: determine format
(ecase cc
  (1 :luminance)
  (2 :luminance-alpha)
  (3 :rgb)
  (4 :rgba))

For the data type, we work from the number of bits per sample.

;;; load-png: determine data-type
(ecase (png:image-bit-depth png)
  (8  :unsigned-byte)
  (16 :unsigned-short))

After we have the texture data loaded, we tell OpenGL how to scale our texture when it needs it in a smaller or larger size. We are going to tell it to use linear filtering whether it needs to minimize or magnify our texture.

;;; load-png: set up texture filters
(gl:tex-parameter :texture-2d :texture-min-filter :linear)
(gl:tex-parameter :texture-2d :texture-mag-filter :linear)

That wraps up making the texture. If we ran into an error somewhere along the line of turning the png into a texture, we’re going to delete the texture if we allocated it and return nil.

;;; load-png: handle errors
(error ()
       (unless texture-id-p
         (gl:delete-textures (list texture-id)))
       nil)

Initializing our texture

To initialize our texture, we’re going to load it with the function above. Assuming that it loaded okay, we’re going to go ahead and enable texturing.

;;; display-window extra code
#<:use "display-window: make sure texture is loaded">
#<:use "display-window: enable texturing">

;;; display-window: make sure texture is loaded
(unless (texture-id win)     ; load texture if needed
  (setf (texture-id win)
        (load-png #P"./images/cube-texture.png")))

;;; display-window: enable texturing
(when (texture-id win)       ; enable texturing if we have one
  (gl:enable :texture-2d))

Rotation state

For this tutorial, our rotation state is going to consist of three angles, one for the rotation around the x-axis, one for the rotation around the y-axis, and one for the rotation around the z-axis. Each of these will initially be zero.

;;; extra decls (cont.)
(defclass rotation-state ()
  ((x-angle :initarg :x-angle :reader x-angle)
   (y-angle :initarg :y-angle :reader y-angle)
   (z-angle :initarg :z-angle :reader z-angle))
  (:default-initargs :x-angle 0.0
                     :y-angle 0.0
                     :z-angle 0.0))

We’re also going to add the rotation state into our window class.

;;; extra slots (cont.)
(rotation-state :initarg :rotation-state :accessor rotation-state)


And, make sure we initialize our rotation state.

;;; extra initargs
:rotation-state (make-instance 'rotation-state)

Preparing the tick function

Again, we’re going to try to stay near 60 frames per second. Recall that the tick interval is specified in milliseconds per tick.

;;; extra initargs (cont.)
:tick-interval (round 1000 60)  ; milliseconds per tick

We’re going to use a different rotation speed for each axis. We’ll update all three at once in the tick method.

;;; extra code
(defmethod glut:tick ((win my-window))
                                ; retrieve the current rotation
  (let* ((cur (rotation-state win))
                                ; retrieve the current angles
         (x-angle (x-angle cur))
         (y-angle (y-angle cur))
         (z-angle (z-angle cur)))

    (setf (rotation-state win)  ; replace the rotation state
          (make-instance 'rotation-state
                         :x-angle (+ x-angle 0.3)
                         :y-angle (+ y-angle 0.2)
                         :z-angle (+ z-angle 0.4))))

  (glut:post-redisplay))        ; tell GLUT to redraw

Drawing textured cubes

In the base code, we already cleared the color buffer and the depth buffer and reset the modelview matrix. Now, retrieve our rotation angles, move back into the screen, rotate through each of our angles, and draw the cube with textures.

;;; display extra code
(let* ((cur (rotation-state win))
       (x-angle (x-angle cur))
       (y-angle (y-angle cur))
       (z-angle (z-angle cur)))

  (gl:translate 0.0 0.0 -5.0)   ; move and rotate
  (gl:rotate x-angle 1.0 0.0 0.0)
  (gl:rotate y-angle 0.0 1.0 0.0)
  (gl:rotate z-angle 0.0 0.0 1.0)

  #<:use "draw textured-cube">)       ; draw the cube

Drawing the cube

To draw the cube, we first want to make sure that we have the right texture selected. Then we are going to draw each face of the cube as a textured quad.

;;; draw textured-cube
(when (texture-id win)          ; bind the texture if we have it
  (gl:bind-texture :texture-2d (texture-id win)))
(gl:with-primitives :quads
  #<:use "draw textured cube faces">)

The texured cube faces are going to be like our colored faces. Before each vertex though, instead of specifying a color, we’re going to specify the texture coordinates for that vertex. The coordinates in the texture range from 0.0 to 1.0. The point (0,0) is at the top left of the texture and the point (1,1) is at the bottom right of the texure.

This isn’t the same coordinate system mentioned in the original NeHe document. The reason for that is that he is loading a Windows Bitmap. Windows Bitmaps are stored with the image from bottom to top as you proceed through the file.

Here is the front face. Note how we are going counterclockwise in both the texture coordinates and the spatial coordinates. (Note: It is traditional to show the texture coordinates and vertex coordinates as sort of two columns of source code.)

;;; draw textured cube faces
;; front face
(gl:tex-coord 0.0 1.0) (gl:vertex -1.0 -1.0  1.0)
(gl:tex-coord 1.0 1.0) (gl:vertex  1.0 -1.0  1.0)
(gl:tex-coord 1.0 0.0) (gl:vertex  1.0  1.0  1.0)
(gl:tex-coord 0.0 0.0) (gl:vertex -1.0  1.0  1.0)

The same sort of logic continues around to the remaining five faces. I’m going to write a little function though to hopefully speed this along. Hopefully, if I use constants and an inline function, most of the calculation herein will get optimized into constants, too.

;;; extra decls (cont.)
(declaim (inline cube-face))
(defun cube-face (left up forw)
  (gl:tex-coord 0.0 1.0)        ; bottom-left
  (gl:vertex (+ (- (elt left 0)) (- (elt up 0)) (elt forw 0))
             (+ (- (elt left 1)) (- (elt up 1)) (elt forw 1))
             (+ (- (elt left 2)) (- (elt up 2)) (elt forw 2)))

  (gl:tex-coord 1.0 1.0)        ; bottom-right
  (gl:vertex (+ (+ (elt left 0)) (- (elt up 0)) (elt forw 0))
             (+ (+ (elt left 1)) (- (elt up 1)) (elt forw 1))
             (+ (+ (elt left 2)) (- (elt up 2)) (elt forw 2)))

  (gl:tex-coord 1.0 0.0)        ; top-right
  (gl:vertex (+ (+ (elt left 0)) (+ (elt up 0)) (elt forw 0))
             (+ (+ (elt left 1)) (+ (elt up 1)) (elt forw 1))
             (+ (+ (elt left 2)) (+ (elt up 2)) (elt forw 2)))

  (gl:tex-coord 0.0 0.0)        ; top-left
  (gl:vertex (+ (- (elt left 0)) (+ (elt up 0)) (elt forw 0))
             (+ (- (elt left 1)) (+ (elt up 1)) (elt forw 1))
             (+ (- (elt left 2)) (+ (elt up 2)) (elt forw 2))))

Now, I can whip through the faces just saying which way is left, which way is up, and which way is forward for that face.

;;; draw textured cube faces (cont.)
;; back face
(cube-face #(1.0 0.0 0.0)  #(0.0 -1.0  0.0) #(0.0 0.0 -1.0))
;; top face
(cube-face #(1.0 0.0 0.0)  #(0.0  0.0 -1.0) #(0.0 1.0 0.0))
;; bottom face
(cube-face #(1.0 0.0 0.0)  #(0.0  0.0  1.0) #(0.0 -1.0 0.0))
;; right face
(cube-face #(0.0 0.0 -1.0) #(0.0  1.0  0.0) #(1.0 0.0 0.0))
;; left face
(cube-face #(0.0 0.0  1.0) #(0.0  1.0  0.0) #(-1.0 0.0 0.0))

And, now we have a textured cube.

NeHe Tutorial 05: Solids June 2nd, 2010
Patrick Stein

Introduction

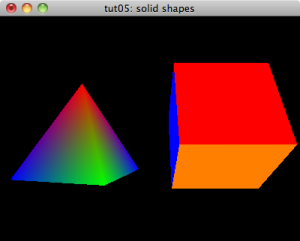
In the previous tutorial, we drew a rotating triangle and a rotating square on the screen. The next NeHe tutorial fleshes out these polygons into solid shapes: a (square-bottomed) pyramid and a cube.

Again, we’re going to start with our simple-tutorial base.

;;; *.lisp
#<:use "simple-tutorial.lisp">

Here is the resulting tut05.lisp.

;;; window title
"tut05: solid shapes"

This tutorial is almost identical to the previous one. For variety, I am going to use what I called the alternate version of managing the modelview matrix in the previous tutorial.

Rotation state

Again, our rotation state is just going to be two angles: one for the pyramid and one for the cube. They are both going to default to zero.

;;; extra decls
(defclass rotation-state ()
  ((pyramid-angle :initarg :pyramid-angle :reader pyramid-angle)
   (cube-angle :initarg :cube-angle :reader cube-angle))
  (:default-initargs :pyramid-angle 0.0
                     :cube-angle 0.0))

We’re also going to add the rotation state into our window class.

;;; extra slots
(rotation-state :initarg :rotation-state :accessor rotation-state)


And, make sure we initialize our rotation state.

;;; extra initargs
:rotation-state (make-instance 'rotation-state)

Preparing the tick function

Again, we’re going to try to stay near 60 frames per second.

;;; extra initargs (cont.)
:tick-interval (round 1000 60)  ; milliseconds per tick

And, our tick method is unchanged from the previous tutorial except that we now have a pyramid and cube instead of a triangle and quad.

;;; extra code
(defmethod glut:tick ((win my-window))
                                ; retrieve the current rotation
  (let* ((cur (rotation-state win))
                                ; retrieve the current angles
         (pyramid (pyramid-angle cur))
         (cube (cube-angle cur)))

    (setf (rotation-state win)  ; replace the rotation state
          (make-instance 'rotation-state
                         :pyramid-angle (+ pyramid 0.2)
                         :cube-angle (+ cube 0.15))))

  (glut:post-redisplay))        ; tell GLUT to redraw

Drawing rotated pyramids and cubes

In the base code, we already cleared the color buffer and the depth buffer and reset the modelview matrix. Now, we’re going to retrieve our rotations, position our pyramid, save our modelview matrix, rotate for it, draw it, and restore our saved modelview matrix. Then, we’re going to position our cube, save our modelview matrix, rotate for it, draw it, and restore our saved modelview matrix.

;;; display extra code
(let* ((cur (rotation-state win))
       (pyramid-angle (pyramid-angle cur))
       (cube-angle (cube-angle cur)))
  #<:use "position pyramid">
  (gl:with-pushed-matrix
      #<:use "rotate pyramid">
      #<:use "draw pyramid">
      )
  #<:use "position cube">
  (gl:with-pushed-matrix
      #<:use "rotate cube">
      #<:use "draw cube">
      )
  )

Drawing the pyramid

For the pyramid, we’re going to slide to the left and back into the screen.

;;; position pyramid
(gl:translate -1.5 0.0 -6.0)    ; translate left and into the screen

Then, we’re going to rotate the coordinate system around the Y-axis.

;;; rotate pyramid
                                ; rotate around the y-axis
(gl:rotate pyramid-angle 0.0 1.0 0.0)


Again, the first parameter to rotate is an angle (in degrees). The remaining parameters are the axis about which to rotate.

Now, we’re going to draw the pyramid. We’re going to draw each of the four triangles that make up the pyramid. We’re going to keep each vertexes colored the same way regardless of which face the vertex is being drawn on at the moment.

;;; draw pyramid
(gl:with-primitives :triangles  ; start drawing triangles
  #<:use "draw pyramid faces">
  )

The front face is going to be just about the same as our triangle from the previous tutorials. We’re just going to kick the bottom forward a bit.

;;; draw pyramid faces
(gl:color 1.0 0.0 0.0)          ; set the color to red
(gl:vertex 0.0 1.0 0.0)         ; top vertex (front)
(gl:color 0.0 1.0 0.0)          ; set the color to green
(gl:vertex -1.0 -1.0 1.0)       ; bottom-left vertex (front)
(gl:color 0.0 0.0 1.0)          ; set the color to blue
(gl:vertex 1.0 -1.0 1.0)        ; bottom-right vertex (front)

The right face is going to share two vertexes with our front face and introduce a third.

;;; draw pyramid faces (cont.)
(gl:color 1.0 0.0 0.0)          ; set the color to red
(gl:vertex 0.0 1.0 0.0)         ; top vertex (right)
(gl:color 0.0 0.0 1.0)          ; set the color to blue
(gl:vertex 1.0 -1.0 1.0)        ; bottom-left vertex (right)
(gl:color 0.0 1.0 0.0)          ; set the color to green
(gl:vertex 1.0 -1.0 -1.0)       ; bottom-left vertex (right)

The back face is going to share two points with the right face and one point with the front face.

;;; draw pyramid faces (cont.)
(gl:color 1.0 0.0 0.0)          ; set the color to red
(gl:vertex 0.0 1.0 0.0)         ; top vertex (back)
(gl:color 0.0 1.0 0.0)          ; set the color to green
(gl:vertex 1.0 -1.0 -1.0)       ; bottom-left vertex (back)
(gl:color 0.0 0.0 1.0)          ; set the color to blue
(gl:vertex -1.0 -1.0 -1.0)      ; bottom-left vertex (back)

The left face is going to share two points with the back face and two points with the front face (and, of course, the apex with the right face).

;;; draw pyramid faces (cont.)
(gl:color 1.0 0.0 0.0)          ; set the color to red
(gl:vertex 0.0 1.0 0.0)         ; top vertex (left)
(gl:color 0.0 0.0 1.0)          ; set the color to blue
(gl:vertex -1.0 -1.0 -1.0)      ; bottom-left vertex (left)
(gl:color 0.0 1.0 0.0)          ; set the color to green
(gl:vertex -1.0 -1.0 1.0)       ; bottom-left vertex (left)

This completes the four sides of our pyramid. The NeHe tutorial doesn’t bother drawing a bottom for the pyramid. It won’t ever be seen with the way the rest of this code is organized, but I am going to include it here for completeness.

;;; draw pyramid (cont.)
(gl:with-primitives :quads
  (gl:color 0.0 0.0 1.0)        ; set the color to blue
  (gl:vertex 1.0 -1.0 1.0)      ; front-right corner
  (gl:color 0.0 1.0 0.0)        ; set the color to green
  (gl:vertex 1.0 -1.0 -1.0)     ; back-right corner
  (gl:color 0.0 0.0 1.0)        ; set the color to blue
  (gl:vertex -1.0 -1.0 -1.0)    ; back-left corner
  (gl:color 0.0 1.0 0.0)        ; set the color to green
  (gl:vertex -1.0 -1.0 1.0))    ; front-left corner

Drawing the cube

At the point we need to position the cube, we’re sitting at the point where the triangle was drawn. So, we need to slide to the right before drawing the cube.

;;; position cube
(gl:translate  3.0 0.0 0.0)     ; translate right

Now, we’re going to rotate the coordinate system around the x-axis.

;;; rotate cube
                                ; rotate around the x-axis
(gl:rotate cube-angle 1.0 0.0 0.0)

Now, we’re going to draw the cube with each face a different color.

;;; draw cube
(gl:with-primitives :quads      ; start drawing quadrilaterals
  #<:use "draw cube faces">
  )

The top face is going to be green. We are taking care here to draw the vertexes in counter-clockwise order when viewed from above the cube.

;;; draw cube faces
(gl:color 0.0 1.0 0.0)          ; set the color to green
(gl:vertex  1.0  1.0 -1.0)      ; right top back
(gl:vertex -1.0  1.0 -1.0)      ; left top back
(gl:vertex -1.0  1.0  1.0)      ; left top front
(gl:vertex  1.0  1.0  1.0)      ; right top front

The bottom face is going to be orange. We are still taking care to draw the vertexes in counter-clockwise order when looking at this face from outside the cube. For the bottom face, that would be looking at the cube from below. For consistency, should we later want to texture map the cube, we’re going to start working from the front of the cube this time instead of the back as if we just flipped the cube 180 degrees forward and are now looking at the bottom.

;;; draw cube faces (cont.)
(gl:color 1.0 0.5 0.0)          ; set the color to orange
(gl:vertex  1.0 -1.0  1.0)      ; right bottom front
(gl:vertex -1.0 -1.0  1.0)      ; left bottom front
(gl:vertex -1.0 -1.0 -1.0)      ; left bottom back
(gl:vertex  1.0 -1.0 -1.0)      ; right bottom back

Next, we’re going to draw the front face. We are going to make it red. Again, we’re going to keep our vertexes counter clockwise and we’re going to start with the one that’s in the upper right when we’re looking at the face.

;;; draw cube faces (cont.)
(gl:color 1.0 0.0 0.0)          ; set the color to red
(gl:vertex  1.0  1.0  1.0)      ; right top front
(gl:vertex -1.0  1.0  1.0)      ; left top front
(gl:vertex -1.0 -1.0  1.0)      ; left bottom front
(gl:vertex  1.0 -1.0  1.0)      ; right bottom front

Next, we’re going to draw the back face. We are going to make it yellow. Again, we’re going to keep our vertexes counter clockwise and we’re going to start with the one that’s in the upper right when we’re looking at the face (as if we’ve rotated the cube forward 180 degrees so that what was back is now front).

;;; draw cube faces (cont.)
(gl:color 1.0 1.0 0.0)          ; set the color to yellow
(gl:vertex  1.0 -1.0 -1.0)      ; right bottom back
(gl:vertex -1.0 -1.0 -1.0)      ; left bottom back
(gl:vertex -1.0  1.0 -1.0)      ; left top back
(gl:vertex  1.0  1.0 -1.0)      ; right top back

We’re going to draw the left side in blue.

;;; draw cube faces (cont.)
(gl:color 0.0 0.0 1.0)          ; set the color to blue
(gl:vertex -1.0  1.0  1.0)      ; left top front
(gl:vertex -1.0  1.0 -1.0)      ; left top back
(gl:vertex -1.0 -1.0 -1.0)      ; left bottom back
(gl:vertex -1.0 -1.0  1.0)      ; left bottom front

For this tutorial, we’re never going to see the right side of the cube, but we’re going to draw it anyway for completeness. It will be magenta.

;;; draw cube faces (cont.)
(gl:color 1.0 0.0 1.0)          ; set the color to magenta
(gl:vertex  1.0  1.0 -1.0)      ; right top back
(gl:vertex  1.0  1.0  1.0)      ; right top front
(gl:vertex  1.0 -1.0  1.0)      ; right bottom front
(gl:vertex  1.0 -1.0 -1.0)      ; right bottom back

And, now we have a cube.

Important note

In all of the above examples, we have only used vertex inside a with-primitives call. There is good reason for this. We cannot just make a vertex whenever we want. It has to be a part of a shape. The with-primitives call starts building a shape (so far, we’ve only used triangles or quads) and then ends the shape at the end of the form. In C, we would need to do something like this to explicitly begin and end the shape.

/* example-triangle.c */
glBegin(GL_TRIANGLES);
   glVertex3f(  0.0,  1.0,  0.0 );
   glVertex3f( -1.0, -1.0,  0.0 );
   glVertex3f(  1.0, -1.0,  0.0 );
glEnd();

If you try to make a vertex that isn’t part of a shape, things get corrupted. In C, you can probably still limp along and never notice. Unless you explicitly check the OpenGL error state on a regular basis, you’ll never notice that OpenGL is screaming quietly to itself.

CL-OpenGL checks the OpenGL error state for us though. It notices right away that something has gone wrong if we try to make a vertex outside of a with-primitives call.

NeHe Tutorial 04: Rotation June 2nd, 2010
Patrick Stein

Introduction

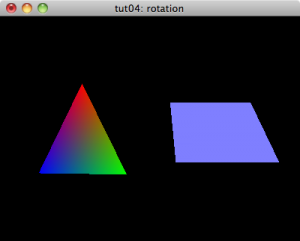
In the previous tutorial, we drew a colored triangle and quadrilateral on the screen. The next NeHe tutorial rotates these polygons on the screen.

This tutorial will mark my first significant departures from the original NeHe tutorials. In this NeHe tutorial, he updates the polygons’ angles inside the display function. I’m going to move those out into GLUT’s tick function. The NeHe tutorial also keeps those angles in some global variables. I am going to tuck them inside my window class.

Again, we’re going to start with our simple-tutorial base.

;;; *.lisp
#<:use "simple-tutorial.lisp">

Here is the resulting tut04.lisp.

;;; window title
"tut04: rotation"

Rotation state

Our rotation state is just going to be two angles: one for the triangle and one for the quad. They are both going to default to zero.

;;; extra decls
(defclass rotation-state ()
  ((triangle-angle :initarg :triangle-angle :reader triangle-angle)
   (quad-angle :initarg :quad-angle :reader quad-angle))
  (:default-initargs :triangle-angle 0.0
                     :quad-angle 0.0))


I have opted here to make the rotation-state immutable (unless you side-step and act on the slots directly). I’m doing this largely as a personal experiment. Below, you will see that rather than update the members of the rotation state in the window, I simply replace the whole rotation state for the window. You may not wish to do this yourself, especially for something so simple as a pair of angles.

We’re also going to add the rotation state into our window class.

;;; extra slots
(rotation-state :initarg :rotation-state :accessor rotation-state)


;;; extra initargs
:rotation-state (make-instance 'rotation-state)

Preparing the tick function

CL-GLUT provides us with an easy mechanism to get a callback at a regular interval. First, we need to add another initarg when we create our window to tell it how often we’d like a callback. We’re going to try to stay near 60 frames per second. The tick interval is specified in milliseconds.

;;; extra initargs (cont.)
:tick-interval (round 1000 60)  ; milliseconds per tick

Then, we need to fill in the body of the callback. In the callback, we’re going to update the rotation state and then let GLUT know we need to redraw the screen.

;;; extra code
(defmethod glut:tick ((win my-window))
                                ; retrieve the current rotation
  (let* ((cur (rotation-state win))
                                ; retrieve the current angles
         (tri (triangle-angle cur))
         (quad (quad-angle cur)))

    (setf (rotation-state win)  ; replace the rotation state
          (make-instance 'rotation-state
                         :triangle-angle (+ tri 0.2)
                         :quad-angle (+ quad 0.15))))

  (glut:post-redisplay))        ; tell GLUT to redraw

Drawing rotated triangles and quadrilaterals

In the base code, we already cleared the color buffer and the depth buffer and reset the modelview matrix. In our previous two tutorials, we positioned the triangle, drew it, then moved from there over to where we were going to draw the quadrilateral.

Now though, we’re going to have to be more careful. We’re going to move over to where the triangle is to be drawn, rotate the coordinate system, and draw the triangle. If we then tried to translate over to where we want to draw the quadrilateral, we’d have to figure out how to do it in the rotated coordinate system. Rather than do that, we are just going to reset the transformation altogether before positioning the quad.

;;; display extra code
(let* ((cur (rotation-state win))
       (triangle-angle (triangle-angle cur))
       (quad-angle (quad-angle cur)))
  #<:use "position triangle">
  #<:use "rotate triangle">
  #<:use "draw triangle">
  #<:use "reset transformation">
  #<:use "position quad">
  #<:use "rotate quad">
  #<:use "draw quad">
  )

Drawing the triangle

For the triangle, we’re going to slide to the left and back into the screen.

;;; position triangle
(gl:translate -1.5 0.0 -6.0)    ; translate left and into the screen

Then, we’re going to rotate the coordinate system around the Y-axis.

Imagine you’re riding on your bicycle. If your front wheel were centered at the origin, it would be rotating around the X-axis.

If a revolving door is centered at the origin, it would be rotating around the Y-axis.

If your car steering wheel is centered at the origin, you rotate it around the Z-axis to turn the car.

So, to draw the triangle rotated, we’re going to rotate the coordinate system around the Y-axis.

;;; rotate triangle
                                ; rotate around the y-axis
(gl:rotate triangle-angle 0.0 1.0 0.0)


The first parameter to rotate is an angle (in degrees). The remaining parameters are the axis about which to rotate.

Now, we’re just going to draw the triangle like we did in the previous tutorial.

;;; draw triangle
(gl:with-primitives :triangles  ; start drawing triangles
  (gl:color 1.0 0.0 0.0)        ; set the color to red
  (gl:vertex 0.0 1.0 0.0)       ; top vertex
  (gl:color 0.0 1.0 0.0)        ; set the color to green
  (gl:vertex -1.0 -1.0 0.0)     ; bottom-left vertex
  (gl:color 0.0 0.0 1.0)        ; set the color to blue
  (gl:vertex 1.0 -1.0 0.0))     ; bottom-right vertex

Resetting the modelview transform

To reset the transformation, we’re just going to load the identity transformation again. Below, we will show an alternate way to write this code that doesn’t involve going the whole way back to a blank slate.

;;; reset transformation
(gl:load-identity)

Drawing the quadrilateral

In the previous tutorials, we translated 3.0 0.0 0.0 to get from where the triangle was drawn to where the quadrilateral will be drawn. This time, though, we have already gone back to center. We will need to translate to the right and back into the screen.

;;; position quad
(gl:translate  1.5 0.0 -6.0)    ; translate right and into the screen

Now, we’re going to rotate the coordinate system around the x-axis.

;;; rotate quad
                                ; rotate around the x-axis
(gl:rotate quad-angle 1.0 0.0 0.0)

Then, we’ll just draw the quadrilateral exactly as we did in the previous tutorial.

;;; draw quad
(gl:color 0.5 0.5 1.0)          ; set the color to light blue
(gl:with-primitives :quads      ; start drawing quadrilaterals
  (gl:vertex -1.0  1.0  0.0)    ; top-left vertex
  (gl:vertex  1.0  1.0  0.0)    ; top-right vertex
  (gl:vertex  1.0 -1.0  0.0)    ; bottom-right vertex
  (gl:vertex -1.0 -1.0  0.0))   ; bottom-left vertex

In the previous tutorial, we mentioned that the color is now set to light blue until we explicitly change it again. Similarly, the modelview matrix is set to be shifted to the right and into the screen and then rotated around the x-axis. It will be like this until we explicitly reset it. Fortunately, our template code resets the modelview matrix to the identity matrix at the very beginning of our display routine.

Drawing rotated triangles and quadrilaterals (alternate version)

In the previous section, we positioned, rotated, and drew the triangle. Then, we reset the modelview matrix and positioned, rotated, and drew the quadrilateral.

Sometimes, you don’t want to have to reset everything back to the the identity matrix before continuing on. For that, we can take advantage of the with-pushed-matrix macro provided by CL-OpenGL.

OpenGL maintains a (finite) stack on which you can push the modelview matrix (and a smaller stack on which you can push the projection matrix). In C, you have to explicitly push and pop the matrix:

/* example-of-push-matrix.c */
glPushMatrix();
   // do something here
glPopMatrix();


With CL-OpenGL, you can take advantage of the with- pattern to avoid having to remember to keep your pushes and pops paired up. The with-pushed-matrix effectively remembers the current transformation and restores it at the end of the form.

;;; display extra code (alternate) .lisp
(let* ((cur (rotation-state win))
       (triangle-angle (triangle-angle cur))
       (quad-angle (quad-angle cur)))
  #<:use "position triangle">
  (gl:with-pushed-matrix
      #<:use "rotate triangle">
      #<:use "draw triangle">
      )
  #<:use "position quad (original) .lisp">
  (gl:with-pushed-matrix
      #<:use "rotate quad">
      #<:use "draw quad">
      )
  )

Here, we can go back to the original positioning for the quadrilateral because at the time we’re going to move, we’re back to using the original matrix from where we positioned the triangle. We don’t have to move back into the screen, but we have to move twice as far to the right.

;;; position quad (original) .lisp
(gl:translate 3.0 0.0 0.0)      ; translate right


Everything else is the same as in the previous section.

NeHe Tutorial 03: Color June 1st, 2010
Patrick Stein

Introduction

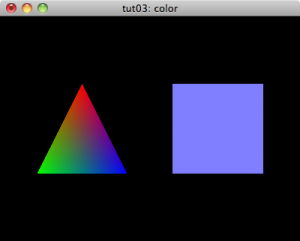
In the previous tutorial, we drew a plain triangle and quadrilateral on the screen. The next NeHe tutorial colors this triangle and quadrilateral.

We’re going to start with our simple-tutorial base.

;;; *.lisp
#<:use "simple-tutorial.lisp">

;;; window title
"tut03: color"

Drawing colored triangles and quadrilaterals

In the base display code, we already cleared the color buffer and the depth buffer and reset the modelview matrix. Now, we’re going to translate the modelview matrix so that when we draw our triangle, it is going to be in front of our viewpoint and off to our left. Then, we’ll draw the triangle, translate over toward the right, and draw the quadrilateral.

;;; display extra code
(gl:translate -1.5 0.0 -6.0)    ; translate left and into the screen
#<:use "draw triangle">
(gl:translate 3.0 0.0 0.0)      ; translate right
#<:use "draw quadrilateral">


The above is untouched from the previous tutorial.

Drawing with vertex coloring

Now that we’ve moved over to the side a little bit and back a ways, we’re going to draw a triangle. We open with the with-primitives call and then specify the vertexes.

;;; draw triangle
(gl:with-primitives :triangles  ; start drawing triangles
  #<:use "draw triangle vertexes">
  )

Before, we simply listed the vertexes. Here, we are going to specify a color before each vertex.

;;; draw triangle vertexes
  (gl:color 1.0 0.0 0.0)        ; set the color to red
  (gl:vertex 0.0 1.0 0.0)       ; top vertex


The arguments to color are the red, green, and blue values (respectively). The values range from zero (for the darkest) to one (for the brightest). I have omitted here the optional fourth argument for the alpha channel. It defaults to 1.0.

It is important to note that we have set the global color to red. This vertex will be red because the global color was red at the time we created the vertex. If we failed to ever set the color again, everything would be red.

Here, however, we’re going to make the next vertex green.

;;; draw triangle vertexes (cont.)
  (gl:color 0.0 1.0 0.0)        ; set the color to green
  (gl:vertex -1.0 -1.0 0.0)     ; bottom-left vertex

We are going to make the final vertex blue for this triangle.

;;; draw triangle vertexes (cont.)
  (gl:color 0.0 0.0 1.0)        ; set the color to blue
  (gl:vertex 1.0 -1.0 0.0)      ; bottom-right vertex

Note: the global color is now blue. We could leave it blue and it would be blue until we set it to some other color.

Drawing with flat coloring

Drawing quadrilaterals is much like drawing triangles. Here, of course, we need four vertexes. In this case, however, we’re going to color the whole quadrilateral the same color. So, we are just going to set the global color to a light blue and then draw the quadrilateral exactly as we did in the previous tutorial.

;;; draw quadrilateral
(gl:color 0.5 0.5 1.0)          ; set the color to light blue
(gl:with-primitives :quads      ; start drawing quadrilaterals
  (gl:vertex -1.0  1.0  0.0)    ; top-left vertex
  (gl:vertex  1.0  1.0  0.0)    ; top-right vertex
  (gl:vertex  1.0 -1.0  0.0)    ; bottom-right vertex
  (gl:vertex -1.0 -1.0  0.0))   ; bottom-left vertex

Now, the color is still this light blue. It will remain so until we reset the color to red when drawing the triangle during the next time our screen is redrawn.

NeHe Tutorial 02: Drawing Triangles and Quadrilaterals June 1st, 2010
Patrick Stein

Introduction

In the previous tutorial, we made a basic shell of a CL-OpenGL application. I have slightly modified it for this tutorial so that it has some hooks where we can add in code specific to this tutorial.

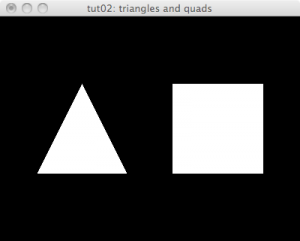
In this tutorial, we’re going to draw a triangle and a quadrilateral in our window. We’re going to start with our simple-tutorial base.

;;; *.lisp
#<:use "simple-tutorial.lisp">

Here is the whole tut02.lisp.

;;; window title
"tut02: triangles and quads"

Drawing triangles and quadrilaterals

In the base display code, we already cleared the color buffer and the depth buffer and reset the modelview matrix. Now, we’re going to translate the modelview matrix so that when we draw our triangle, it is going to be in front of our viewpoint and off to our left. Then, we’ll draw the triangle, translate over toward the right, and draw the quadrilateral.

;;; display extra code
(gl:translate -1.5 0.0 -6.0)    ; translate left and into the screen
#<:use "draw triangle">
(gl:translate 3.0 0.0 0.0)      ; translate right
#<:use "draw quadrilateral">


The parameters to gl:translate are x, y, and z (respectively). After the gl:load-identity, the modelview matrix is centered at the origin with the positive x axis pointing to the right of your screen, the positive y axis pointing up your screen, and the positive z-axis pointing out of your screen.

With the way that we set up the projection matrix in the reshape method, the origin of the modelview space should be dead-center in our window.

Drawing triangles

Now that we’ve moved over to the side a little bit and back a ways, we’re going to draw a triangle. The CL-OpenGL code looks like this:

;;; draw triangle
(gl:with-primitives :triangles  ; start drawing triangles
  (gl:vertex  0.0  1.0  0.0)    ; top vertex
  (gl:vertex -1.0 -1.0  0.0)    ; bottom-left vertex
  (gl:vertex  1.0 -1.0  0.0))   ; bottom-right vertex


The with-primitives form lets OpenGL know how to use the vertexes we’re going to make. In this case, it’s going to make a triangle out of each set of three vertexes. If we had six vertexes there, we’d end up with two triangles.

Here, we drew the vertexes in clockwise order. By default, OpenGL considers this triangle to be facing away from us, then. With our current OpenGL settings, this does not make a difference since OpenGL will draw both front and back faces.

Each call to vertex gives the x, y, and z (respectively) coordinates in the modelview projection for the vertex. You will note that I used floating-point numbers here. I could have easily written them as integers like (gl:vertex 1 -1 0). CL-OpenGL would convert them to floating point numbers for me on the fly. I tend to use floating point constants when possible to try to save it the extra work. I should check, sometime, to be sure though that I don’t pay a boxing/unboxing penalty that negates the benefit.

Drawing quadrilaterals

Drawing quadrilaterals is much like drawing triangles. Here, of course, we need four vertexes.

;;; draw quadrilateral
(gl:with-primitives :quads      ; start drawing quadrilaterals
  (gl:vertex -1.0  1.0  0.0)    ; top-left vertex
  (gl:vertex  1.0  1.0  0.0)    ; top-right vertex
  (gl:vertex  1.0 -1.0  0.0)    ; bottom-right vertex
  (gl:vertex -1.0 -1.0  0.0))   ; bottom-left vertex


In this case, we drew a square. We could draw any convex quadrilateral.

Again, we drew the vertexes in clockwise order. By default, OpenGL considers this triangle to be facing away from us, then. With our current OpenGL settings, this does not make a difference since OpenGL will draw both front and back faces.

Toggling Fullscreen mode

We’re also going to add a slot that keeps track of whether or not our window is full screen.

;;; extra slots
(fullscreen :initarg :fullscreen :reader fullscreen-p)


;;; extra initargs
:fullscreen nil

Then, before we display our window, we’re going to switch to fullscreen mode if this is true.

;;; display-window extra code
(when (fullscreen-p win)        ; check to see if fullscreen needed
  (glut:full-screen))           ; if so, then tell GLUT

Switching based on keyboard event

Here, we add an extra case to the keypress handler. We destroy our window and create a new one with the fullscreen property toggled if we get an 'f' on the keyboard.

;;; keyboard extra cases
((#\f #\F)                      ; when we get an 'f'
                                ; save whether we're in fullscreen
     (let ((full (fullscreen-p win)))
       (glut:close win)         ; close the current window
       (glut:display-window     ; open a new window with fullscreen toggled
           (make-instance 'my-window
                          :fullscreen (not full)))))

l